TQMa62xx - YOCTO Linux BSP documentation
Create SD-Card image
Create SD Card with BSP Image
The Image can be simply written to the SD Card by using the dd shell command in Linux:
$ cd <path to your image>
$ sudo dd if=tq-image-weston-debug-tqma62xx-mba62xx.rootfs.wic of=/dev/sdc bs=1M conv=fsync #Assuming the SD card is assigned to /dev/sdc
To identify the SD card in Linux the shell command dmesg can be used:
- Open a new terminal
- Execute the following command without plugged SD Card
$ dmesg | tail -n 15
- Insert SD Card and wait a few seconds
- Run the command from step two again
$ dmesg | tail -n 15
 #plug in SD Card into the reader
$ dmesg | tail -n 15
USB Boot
USB Boot
The TI Sitara AM62x CPU provides the option to boot from USB (host and device).
Prerequisites
- Build BSP following STKa62xx Yocto BSP quickstart guide.
- Booting the STKa62xx from USB device requires a Linux based host PC to run the dfu-util.
Boot from USB host (mass storage)
1. Format a USB flash drive with FAT32 filesystem.
2. Copy the files listed below from the Yocto buildspace deploy directory to the USB flash drive prepared with FAT32:
- u-boot.img
- tispl.bin
- tiboot3.bin
3. Connect the USB flash drive with the USB 3.0 the USB-OTG interface.
4. Set the STKa62xx DIP switches to boot from USB host (mass storage).
S4 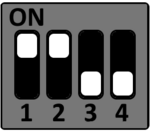
S5 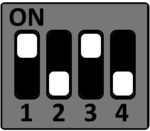
S6 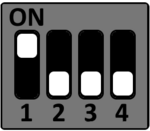
S7 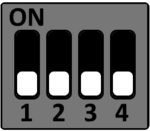
5. Connect host PC with STKa62xx connector X10 and setup the terminal program.
Please see the terminal_emulator section how to setup a serial debug connection.
6. Power on the STKa62xx to boot from USB.
Boot from USB device (dfu-util)
Please check that dfu-util is installed the Linux host.
1. Copy the files below from the Yocto buildspace deploy directory deploy e.g. the home folder:
- u-boot.img
- tispl.bin
- tiboot3.bin
2. Connect STKa62xx X7 and X10 with a mirco USB cable to the Host PC.
- X10 is used to connect the STKa62xx as USB device
- X7 is used as serial debug connection
3. Set the STKa62xx DIP switches to boot from USB device (dfu-util).
S4 
S5 
S6 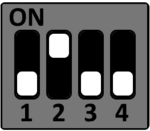
S7 
4. Power up the STKa62xx.
5. Open a second terminal for the serial debug connection with e.g. Minicom
Please see the terminal_emulator section how to setup a serial debug connection.
6. Open terminal (shell) on Linux host and execute the commands below to boot the STKa62xx via USB device.
After a warm boot (reset from U-Boot or reboot from Linux), the initial load of tiboot3.bin must be skipped.
sudo dfu-util -a bootloader -D tiboot3.bin
If the STKa62xx has been reset from U-Boot or Linux it is not required to load tiboot.bin3 twice, so only the three commands below have to be executed.
sudo dfu-util -R -a bootloader -D tiboot3.bin
sudo dfu-util -R -a tispl.bin -D tispl.bin
sudo dfu-util -R -a u-boot.img -D u-boot.img