Add a custom device tree overlay
- TQMa62xx[L] (Standard boot)
- TQMa64xxL (Standard boot)
- TQMa67xx[L] (Standard boot)
This guide describes how to add your own device tree overlay to a BSP image and make it selectable from the U-Boot boot menu.
It applies to every TQ module that uses the U-Boot Standard boot flow with a generated extlinux.conf and a kernel fitImage. On these modules the base device tree and all overlays are packed as separate configurations inside the fitImage. Each boot menu entry selects a base device tree plus one or more overlays, which U-Boot merges at boot time. Adding a custom overlay therefore means getting the overlay into the fitImage, and adding a menu entry that references it.
<build-dir> – your build directory (e.g. tqma67xx_build) <machine> – the MACHINE (e.g. tqma67xx-mba67xx) <base-devicetree> – base device tree name without extension (e.g. k3-am67a-tqma67xx-mba67xx.dtb)
Prerequisites
Prerequisites
- The BSP default image was built according to the Quickstart BSP instructions for the desired module. Please visit the corresponding module documentation in this wiki.
- A custom Yocto layer (meta-custom in this guide) was created and added to conf/bblayers.conf as shown in the Yocto Build System guide which can be found in the How-To section in the corresponding module documentation.
How device trees and overlays are handled in this bootflow
The kernel is built as a fitImage. Every entry of the KERNEL_DEVICETREE variable becomes a configuration node inside that fitImage:
- the base device tree as
conf-<base-devicetree>.dtb - each overlay as
conf-<base-devicetree>-<name>.dtbo
The extlinux.conf is generated by the tq-extlinux recipe (a TQ variant of the Yocto uboot-extlinux-config.bbclass). It does not hardcode a single device tree. Instead, each LABEL selects a base device tree and its overlays through the fitImage configuration syntax on the KERNEL line:
../fitImage#conf-<base-devicetree>.dtb#conf-<base-devicetree>-<name>.dtbo
U-Boot loads the base device tree from the fitImage and applies the listed overlays before passing the merged tree to the kernel (see U-Boot: FIT configuration using overlays). Overlays are not installed as loose .dtbo files in /boot but live inside the fitImage.
KERNEL_DTBVENDORED = “0”. You can list the exact names at any time with dumpimage -l (see Step 5).Step 1: Create the overlay source
Create the overlay source and Makefile entry
The overlay is a device tree overlay source (.dtso) that is added to the kernels device tree directory and compiled into a .dtbo.
For a first test it is good practice to use a “do-nothing” overlay with a marker node. This changes no hardware, but adds a identifiable node so you can prove afterwards that the overlay was applied.
Create the overlay source arch/arm64/boot/dts/ti/<base-devicetree>-test-noop.dtso:
/dts-v1/;
/plugin/;

/ {
	fragment@0 {
		target-path = "/";
		__overlay__ {
			tq-overlay-smoketest {
				compatible = "tq,overlay-smoketest";
				status = "okay";
			};
		};
	};
};
The kernel only builds an overlay if it is referenced from the device tree Makefile in the same directory. The convention used by the BSP is the kbuild overlay merge pattern. A <name>-dtbs := assignment declares the base device tree and the overlay as components and the merged device tree is added to dtb.
Add the following to arch/arm64/boot/dts/ti/Makefile, next to the existing <base-devicetree>-* entries so it inherits the same Kconfig guard (make sure to add it to the section containing the dtb and dtbo files of the selected module).
Into the block with the *-dtbs := assignments:
<base-devicetree>-test-noop-dtbs := \
	<base-devicetree>.dtb <base-devicetree>-test-noop.dtbo
Into the block with the dtb-$(CONFIG_…) += lines (the merged .dtb, not the .dtbo):
dtb-$(CONFIG_ARCH_K3) += <base-devicetree>-test-noop.dtb
Step 2: Pack the overlay into the fitImage
Extend KERNEL_DEVICETREE
Packing the compiled .dtbo into the fitImage is controlled by KERNEL_DEVICETREE. Extend it in a kernel .bbappend in your custom layer.
Create meta-custom/recipes-kernel/linux/linux-ti-tq_%.bbappend:
KERNEL_DEVICETREE:append = " ti/<base-devicetree>-test-noop.dtbo"
This adds the configuration conf-<base-devicetree>-test-noop.dtbo to the fitImage.
Step 3: Add a boot menu entry
Extend the extlinux configuration
A new boot menu entry is added by extending the tq-extlinux recipe. Create meta-custom/recipes-core/tq-bootconf/tq-extlinux.bbappend:
UBOOT_EXTLINUX_LABELS:append = " test-noop"
UBOOT_EXTLINUX_KERNEL_IMAGE_test-noop = "../fitImage#conf-<base-devicetree>.dtb#conf-<base-devicetree>-test-noop.dtbo"
UBOOT_EXTLINUX_MENU_DESCRIPTION_test-noop = "${DISTRO_NAME} on ${MACHINE} (overlay smoke test)"
To stack several overlays in one entry, append further #conf-<base-devicetree>-<name>.dtbo segments to the KERNEL_IMAGE line.
UBOOT_EXTLINUX_KERNEL_IMAGE_test-noop), not with the override syntax (UBOOT_EXTLINUX_KERNEL_IMAGE:test-noop). This matches the style of the existing labels in the machine configuration.Step 4: Rebuild the image
Rebuild
Initialize the build environment as described in the Quickstart BSP guide, then rebuild. The debug image is used here because reading the device tree later requires a console login.
cd ~/workspace/ci-meta-tq
source setup-environment <build-dir>
bitbake tq-image-weston-debug
Step 5: Verify the overlay is in the fitImage
Inspect the fitImage
Before flashing, confirm that the configuration was added. dumpimage is part of u-boot-tools:
dumpimage -l deploy-ti/images/<machine>/fitImage | grep test-noop
You should see both an fdt-<base-devicetree>-test-noop.dtbo image and a conf-<base-devicetree>-test-noop.dtbo configuration.
Step 6: Write to SD card, boot and select the entry
Boot and select the overlay
Write the image to an SD card and boot the target. During boot, U-Boot shows the boot menu including your new entry. For testing purposes, select it interactively.
Step 7: Verify the overlay is applied
Verify on the running target
The base device tree does not contain the marker node so its presence in the live device tree proves that the overlay was applied:
cat /proc/device-tree/tq-overlay-smoketest/compatible; echo
cat /proc/device-tree/tq-overlay-smoketest/status; echo
Expected output is tq,overlay-smoketest and okay. /proc/device-tree is a symlink to /sys/firmware/devicetree/base → the merged tree U-Boot handed to the kernel.
dmesg. Boot-time overlays are applied by U-Boot from the fitImage before the kernel starts, so the kernel logs nothing about them. As a control, boot the default entry (without the overlay) and confirm the node is absent.NXP UUU (Universal Update Utility)
NXP UUU Tool for TQMa95xxSA
The UUU (Universal Update Utility) is an open source program provided by NXP, which is the successor of NXP's MFG Tools, intended to download and execute code on the i.MX SoC family via the Serial Download Protocol (SDP). Documentation, source code, and prebuilt tool releases are available via the NXP mfgtools github repository.
Prerequisites
IMX_SOC_REV:${MACHINE} ?= "A0"
OEI_DDRCONFIG = "TQMa95xxSA.DDR-Timing.${OEI_RAM_SIZE}GB.V16.0005"
If you have not built your software for the correct SOC revision, problems and crashes will occur when using the UUU tool.
- A working Host PC (Linux or Windows).
- The latest UUU release (downloadable from the NXP GitHub releases page).
- The corresponding image files for the TQMa95xxSA (located in the Yocto deploy directory):
- Bootstream:
imx-boot-tqma95xxsa-*-sd.bin-flash_a55 - WIC-Image:
*.wicor*.wic.zst(e.g.,tq-image-generic-debug-tqma95xxsa-4gb-mb-smarc-2.rootfs.wic.zst)
Prepare Hardware (Serial Downloader Mode)
To communicate with the module via USB, it must be set to “Serial Download” mode.
- Power off the module.
- Set the DIP switch S3 on the mainboard (MB-SMARC-2) as follows:
Serial Downloader
S3
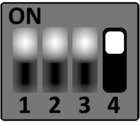
1 - 3 have no effect
- Connect the Host PC via a suitable USB cable to the X4 connector (USB0).
- Power on the board.
- Verify that the device is detected by running the following command in the Host PC terminal:
uuu -lsusb.
UUU Usage
Load and start U-Boot in RAM
To initially boot the board (e.g., with an empty flash memory), U-Boot can be loaded directly into RAM without writing to the eMMC.
Execute the following command in the folder containing the UUU binary and the bootstream:
sudo uuu <bootstream>
Example for the TQMa95xxSA:
sudo uuu imx-boot-tqma95xxsa-4gb-mb-smarc-2-sd.bin-flash_a55
Program complete image to eMMC
This command boots the board and uses the booted system to flash the bootstream and the WIC image to the eMMC.
sudo uuu -bmap -b emmc_all <bootstream> <wic-image>
Example for the TQMa95xxSA:
sudo uuu -bmap -b emmc_all imx-boot-tqma95xxsa-4gb-mb-smarc-2-sd.bin-flash_a55 tq-image-generic-debug-tqma95xxsa-4gb-mb-smarc-2.rootfs.wic.zst
Use a custom workflow (Custom Cmdlist)
For custom flashing procedures (e.g., if you want to program a WIC image to eMMC without writing the boot stream to the eMMC boot partition), UUU commands can be collected in a cmdlist file.
- Create a text file (e.g.,
uuu.tqma95xxsa) in the same directory as the UUU tool. - Insert your desired UUU commands (you can find examples in the UUU documentation).
- Execute the script by passing the
BOOTSTREAMandWICIMAGEvariables:
uuu -e BOOTSTREAM=<bootstream> -e WICIMAGE=<wic image> uuu.tqma95xxsa
An example of a custom script can be found here:
uuu_version 1.5.4

SDPS: delay 500
SDPS: @ boot -f @BOOTSTREAM@

SDPV: delay 1000
SDPV: @ write -f @BOOTSTREAM@ -skipspl -scanterm -scanlimited 0x800000
SDPV: jump -scanlimited 0x800000

FB: ucmd setenv fastboot_dev mmc
FB: ucmd setenv mmcdev ${emmc_dev}
FB: ucmd mmc dev ${emmc_dev}
FB: @ flash -raw2sparse all @WICIMAGE@
FB: done
If the wrong protocol is used in the UUU script (e.g., using SDP instead of SDPS on the i.MX95), the UUU tool will detect the USB device, but the transfer will permanently freeze at the first command (e.g., visible as a hang at 1/ 0 [).
Tip: Determining the correct protocol for your SoC
By running the command
uuu.exe -v
(without any further arguments), the UUU tool lists its internal configuration. In the Pctl (Protocol) column, you can look up the correct protocol prefix assignment for the respective chip (in the Chip column).
Example excerpt:
        Pctl     Chip            Vid     Pid     BcdVersion      Serial_No
        ==================================================
        SDPS:    MX93            0x1fc9  0x014e
        SDPS:    MX95            0x1fc9  0x015d
        SDP:     MX6Q            0x15a2  0x0054
        SDP:     MX8MM           0x1fc9  0x0134
Here you can see that an i.MX8MM script must begin with SDP:, while an i.MX95 script strictly requires SDPS:.
Customize Yocto (General Guide)
| Reference | Explanation |
|---|---|
| <machine> | Target machine name (e.g., tqma62xx, tqma8mpxl, etc.) |
| <build-dir> | Build directory name (e.g., tqma62xx_build) |
| <arch> | CPU architecture (e.g., arm64, arm) |
| <kernel-recipe> | Linux kernel recipe name (e.g., linux-ti-tq, linux-tq, linux-imx) |
Prerequisites
In preparation for this guide, the default BSP image (e.g. tq-image-weston-debug) has to be built according to the module specific quickstart BSP instructions.
Without the creation of a custom Yocto layer
Add a package
During the evaluation, package(s) may be missing in the TQ BSP default image configuration. If you're looking for specific recipes or layers, the OpenEmbedded layer index layer index is a good place to start.
Adding package(s) to the build may require adding additional Yocto meta layer(s)
The easiest approach to add a package recipe to the build, is to use the use IMAGE_INSTALL:append variable in the conf/local.conf file, which is located in the current build space.
Open a new terminal on the development host and navigate into the workspace directory and initialize the build environment as described in the Quickstart BSP:
cd ~/workspace/<path-to-ci-meta-tq>
source setup-environment <build-dir>
The example below demonstrates how to add the editor nano (which is part of the meta-oe Yocto layer) to the build.
Open conf/local.conf with an editor of choice and insert the following lines at the end of the file:
IMAGE_INSTALL:append = " nano"
Multiple packages can also be added using the IMAGE_INSTALL:append variable. This can be done in one line or multiple lines, shown in the two code examples below.
IMAGE_INSTALL:append = " <recipe-name_1> <recipe-name_2>"
# OR
IMAGE_INSTALL:append = " \
                       <recipe-name_1> \
                       <recipe-name_2> \
                       "
Once the desired package(s) have been added, the image can be rebuilt by executing:
bitbake tq-image-weston-debug
Note: Changes to local.conf only affect the current build space. They will be lost when the build space is reset.
Create a custom Yocto layer for customizations
Creating a new Yocto layer
For customer-specific adaptations, we recommend creating an own Yocto meta-layer. For this purpose Bitbake provides a script that simplifies the process of creating new layers.
It creates a template meta-layer with basic structure.
To add a template layer to ci-meta-tq/sources, using the bitbake-layers create-layer script:
cd ~/workspace/<path-to-ci-meta-tq>/sources
bitbake-layers create-layer meta-custom
Before making changes to the new layer, it is recommended to perform the following actions:
- Initialize the new layer as a git repository.
- Edit README template.
- Check and, if necessary, adjust the layer license.
- Configure the layer priority in layer.conf.
📂 meta-custom/
├── 📄 conf/layer.conf
├── 📄 README
├── 📂 recipes-images/
│   └── 📂 images/
│       └── 📄 tq-image-weston-debug.bbappend  (Add packages)
└── 📂 recipes-kernel/
    └── 📂 linux/
        ├── 📂 <kernel-recipe>/
        │   ├── 📄 example.cfg                (Kernel Config Fragments)
        │   └── 📄 example.patch              (Kernel source code patch)
        └── 📄 <kernel-recipe>.bbappend       (Includes .cfg and .patch)
Create a git repository for the new layer
Version control with Git is best practice in software development, so we recommend initializing the new meta-layer as a Git repository.
Move into the directory of the new custom layer:
cd ~/workspace/<path-to-ci-meta-tq>/sources/meta-custom
git init
git add .
git commit -m "Initial Commit"
Configure layer priority
The bitbake-layers create-layer script sets a layer priority of 6 by default. To ensure the custom layer has the higher priority, set the priority BBFILE_PRIORITY_meta-custom to a higher value (e.g., “10”) in conf/layer.conf.
BBFILE_PRIORITY_meta-custom = "10"
Adding the new layer to the build
Before the new layer can be used, it must be added to conf/bblayers.conf in the build directory.
echo 'BBLAYERS += "${BSPDIR}/sources/meta-custom"' >> conf/bblayers.conf
Adding a package to an existing image recipe
The advanced approach is to add packages by creating *.bbappend files to expand the original image recipe (Yocto recipe) without changing it.
In general:
- Locate the original image recipe (e.g., tq-image-weston-debug.bb). This is typically found in
meta-tq/meta-dumpling. - Create a .bbappend file in the custom layer that matches the path structure of the original layer, or place it in a generic recipes-images/images/ directory.
Create the .bbappend file in custom Yocto layer:
mkdir -p ~/workspace/<path-to-ci-meta-tq>/sources/meta-custom/recipes-images/images
cd ~/workspace/<path-to-ci-meta-tq>/sources/meta-custom/recipes-images/images
touch tq-image-weston-debug.bbappend
nano tq-image-weston-debug.bbappend
Add lines below to the new .bbappend file:
IMAGE_INSTALL:append = " <recipe-name>"
# Example:
IMAGE_INSTALL:append = " nano"
For your .bbappend file to work properly, please keep in mind that you should have removed the package (e.g. nano) from the local.conf file if it was added to the build there before. Rebuild the image:
bitbake tq-image-weston-debug
Customize Linux kernel configuration
The Linux kernel configuration is usually defined in a defconfig file (in-tree or out-of-tree) and expanded by TQ-specific fragments.
Using Linux kernel config fragments requires that the kernel recipe is based on linux-yocto.
Create the path:
Recreate the path to the kernel recipe in the custom layer.
Find the kernel recipe corresponding to the machine configuration linux-ti-tq, linux-imx, linux-tq.
Path: ci-meta-tq/sources/meta-custom/recipes-kernel/linux/<kernel-recipe>/<machine>
Menuconfig:
Navigate to the build directory and open menuconfig:
bitbake -c menuconfig virtual/kernel
Diffconfig:
After making changes and saving, create the fragment:
bitbake -c diffconfig virtual/kernel
# The shell will output the path to a fragment.cfg.
Move Fragment:
Move this file to the custom layer path created in Step 1 and rename it (e.g., example.cfg).
Create bbappend:
Create a .bbappend file for the kernel (e.g., <kernel-recipe>.bbappend) in recipes-kernel/linux/ inside the custom layer.
FILESEXTRAPATHS:prepend := "${THISDIR}/${PN}:"
SRC_URI += "file://example.cfg"
Rebuild:
bitbake -c cleansstate virtual/kernel
bitbake tq-image-weston-debug
Creating and adding Linux kernel patch
Creating the patch
1. Navigate to the kernel source directory (usually located in tmp/work-shared/…/kernel-source):
cd ~/workspace/ci-meta-tq/<build-dir>/tmp/work-shared/<machine>/kernel-source
2. Make changes to the source code (e.g., Device Tree in arch/<arch>/boot/dts/…).
3. Create a patch using git:
git diff > example.patch
4. Move example.patch to the custom layer (same path as the .cfg file above).
Add patch to the build
Add the patch to the SRC_URI variable in the kernel .bbappend file (created in the previous section):
FILESEXTRAPATHS:prepend := "${THISDIR}/${PN}:"
SRC_URI += "file://example.patch"
Rebuild the kernel and image as described above.
Creating and using a local kernel repository
For extensive development, using a local git repository is recommended.
1. Clone sources:
Clone the relevant TQ kernel repository to a local folder (e.g., local_repos).
2. Branch:
Create a custom branch and commit the changes locally.
3. Get Commit ID:
Note the commit ID using git rev-parse HEAD.
4. Update bbappend:
In the meta-custom layer, update the kernel .bbappend to point to the local file path.
# Remove the original upstream source
SRC_URI_remove = "${TQ_GIT_BASEURL}/<repo-name>.git;protocol=${TQ_GIT_PROTOCOL};branch=${SRCBRANCH}"

# Add local source
SRC_URI_append = "git://${BSPDIR}/../local_repos/<repo-name>;protocol=file;branch=${SRCBRANCH}"

SRCBRANCH = "custom-branch"
SRCREV = "<Commit-ID>"
Finally, rebuild the kernel:
bitbake -c build virtual/kernel
Troubleshooting & Useful Tips
Verifying Changes and Debugging
Locating the Build Artifacts
Once the build process is successfully completed, the generated images, kernel binaries, and device trees need to be located for deployment onto the target hardware.
All final build artifacts are deployed in the following directory:
cd ~/workspace/ci-meta-tq/<build-dir>/tmp/deploy/images/<machine>/
Look for files ending in .wic, .ext4, or .tar.gz for the root filesystem, and Image / .dtb files for the kernel and device tree.
Verifying Layer Appends
If changes made in a .bbappend file do not seem to take effect, it is crucial to verify if BitBake is actually parsing and applying the custom append file.
To list all recipes and their applied .bbappend files, use the following command:
bitbake-layers show-appends
Search the output for the modified recipe (e.g., tq-image-weston-debug). The custom layer path should be listed under the recipe name.
Checking Variable Evaluation
To verify if a variable (such as IMAGE_INSTALL) contains the newly added packages, the BitBake environment can be printed and filtered:
bitbake -e tq-image-weston-debug | grep ^IMAGE_INSTALL=
This outputs the exact string BitBake uses for the variable after parsing all layers and overrides.
Forcing a Rebuild (Handling Caches)
The Yocto build system utilizes heavy caching (Shared State Cache). When making manual changes to source files or configurations outside of the standard workflow, BitBake might use cached objects instead of recompiling.
To force a clean rebuild of a specific recipe (e.g., the kernel), the state cache for this specific recipe must be cleared before rebuilding:
bitbake -c cleansstate virtual/kernel
bitbake virtual/kernel
cleanall unless strictly necessary, as it will also delete all downloaded source archives for that recipe.