Installation of system software on the eMMC flash
ATTENTION: The following modifications must be applied to the MBa28 prototype board:
- Fix pull-ups boot mode
- Fix PHY addresses
- Fix pull-downs TFT display
Installation of the MFG-Tool
First of all the MFG-Toolkit from Freescale needs to be installed on your PC. In case you already registered with Freescale it is available for download at the following URL:
Just unzip the downloaded archive to a folder of your choice.
Software archives
The system software for the TQMa28 module can be found here:
- MFG Profile Linux Installation (tqma28-mfg-linux-update-yyyymmdd-nn.zip)
- MFG Profile U-Boot-Start (tqma28-mfg-u-boot-yyyymmdd-nn.zip)
After downloading unzip the archives into the subfolder Profiles of the MFG-Tool installation folder. This will create two new directories:
- TQMa28-Linux-Update
- TQMa28-U-Boot
The second profile (“TQMa28-U-Boot”) does not install anything on the flash, it only launches U-Boot. However, when saving the environment within U-Boot, it will be saved to flash.
DIP switch settings (rescue mode)
In order to enable the rescue mode set the DIP switches on the MBa28 as illustrated below:
| rescue mode | ||
|---|---|---|
| DIP | OFF | ON |
| S4 1 | X | |
| S4 2 | X | |
| S4 3 | X | |
| S4 4 | X | |
| S5 1 | X | |
Installation
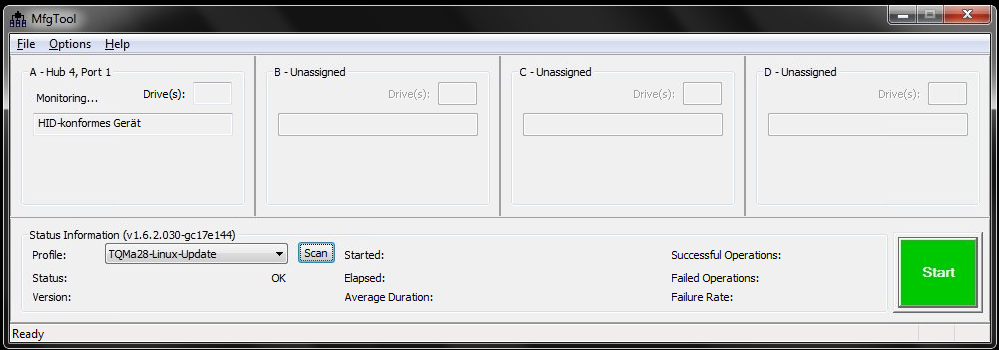
After connecting your PC with a USB type A-A cable to the upper USB socket on the MBa28 mainboard, you can start the MFG tool. Now power on the MBa28 mainboard. The field “A-Hub” should then show “HID-konformes Gerät”.
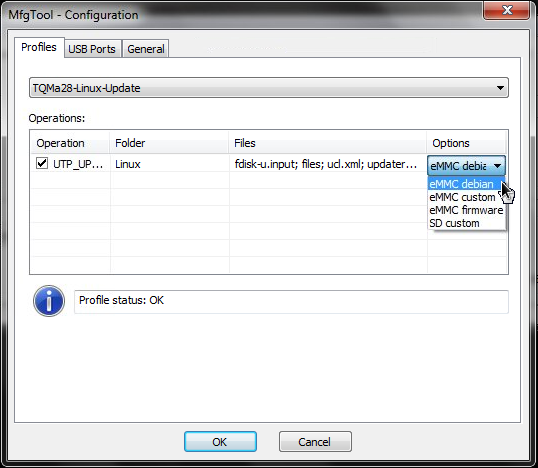
Select “TQMa28-Linux-Update” from the “Profile:” dropdown. Make sure the correct configuration is selected (Options → Configuration). There are four installation options to select from:
| Option | Target | Description |
|---|---|---|
| eMMC debian | eMMC | U-Boot, Kernel, Debian Squeeze Rootfs |
| eMMC custom | eMMC | U-Boot, Kernel, minimal rootfs with X11 and SSH-Login |
| eMMC firmware | eMMC | U-Boot, Kernel, no rootfs |
| SD custom | SD-Card | U-Boot, Kernel, minimal rootfs with X11 und SSH-Login |
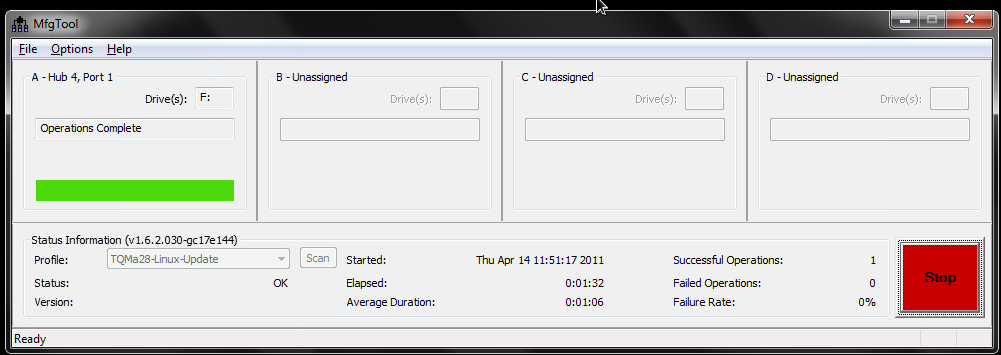
Now select the button “Start” to program U-Boot, linux kernel and root filesystem to the eMMC flash. This operation takes approx. 2 to 20 minutes (depending on the size of the root filesystem). If all went ok the progress bar changes from blue to green.
Booting the system
Remove the USB cable from the MBa28 mainboard and the PC.
Enable the eMMC boot mode again by setting the DIP switches as follows:
| eMMC Boot | ||
|---|---|---|
| DIP | OFF | ON |
| S4 1 | X | |
| S4 2 | X | |
| S4 3 | X | |
| S4 4 | X | |
| S5 1 | X | |
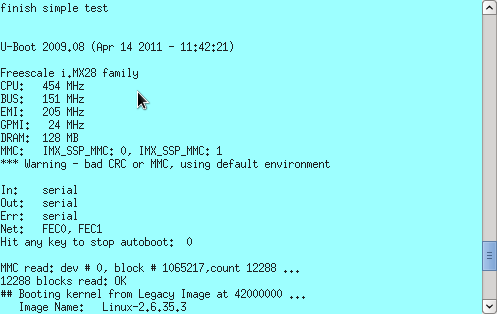
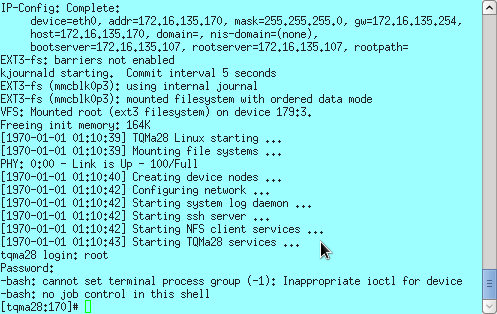
Now reset the system using the reset button. At the console you can see the output of the boot process. The following screenshot shows the boot process for the “custom” root filesystem:
Default settings
| IP-Address | 172.16.135.170 |
| Netmask | 255.255.255.0 |
| Default-Gateway | 172.16.135.254 |
| MAC-Address | 02:00:01:00:00:01 |
| IP-Mode Kernel | static |
| LC-Display | FG0700K5DSSWBG01 |
| root password | root |
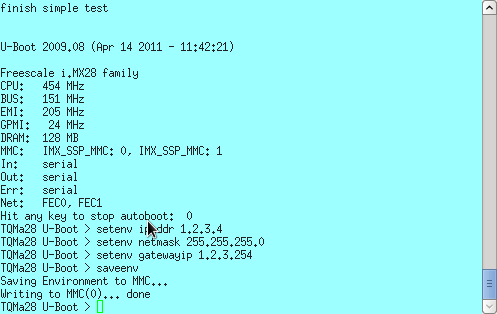
The TCP/IP parameters can be changed in U-Boot. Therefore a serial connection to the MBa28 board is required. Interrupt the boot process by pressing any key. Set new values for the corresponding variables and save the environment:
setenv ipmode static
setenv ipaddr 1.2.3.4
setenv netmask 255.255.255.0
setenv gatewayip 1.2.3.254
setenv ethaddr 02:00:01:00:23:44
saveenv
boot
If ipmode is set and contains the value static, the IP parameters (IP address, gateway, etc.) will be passed to the kernel as a static configuration. If it contains the value dyn, the kernel will configure the first interface using DHCP.
The ethernet MAC address of the second interface (eth1addr) is derived from that of the first interface (ethaddr) by incrementing the last byte. Therefore the default is 02:00:01:00:00:02.
U-Boot itself uses the static configuration by default, e.g. for downloading a kernel image via TFTP.
Currently there is support for two different LC displays, just set the U-Boot variable lcdpanel to the corresponding value:
| value of lcdpanel | Display |
|---|---|
| fg0700 (Default) | FG0700K5DSSWBG01 |
| etq570g0dh6 | EQT570G0DH6 |
| et0350g0dh6 | ET0350G0DH6 |
| none | no display |
setenv lcdpanel etq570g0dh6
Qt-Embedded-Demo
The custom rootfs image contains a Qt Embedded Demonstration. To launch the demo you nee to pass
rundemo=QT
to the kernel as a kernel parameter during boot.
To accomplish this issue the following command at the U-Boot prompt:
setenv addmisc "$addmisc rundemo=QT"
To have the X11 demo automatically start again just issue:
setenv addmisc 'setenv bootargs $bootargs ssp1 panic=1'
DIP switch settings for booting from SD card
The DIP switches on the MBa28 board have to be set up as follows to enable booting from the external SD card:
| Boot from SD card | ||
|---|---|---|
| DIP | OFF | ON |
| S4 1 | X | |
| S4 2 | X | |
| S4 3 | X | |
| S4 4 | X | |
| S5 1 | X | |
For the linux kernel to properly mount the root filesystem on the SD card set the following variable in U-Boot:
setenv mmcdev 1
saveenv
Update of the linux kernel via network
The linux kernel can be updated while the system is still operational. For this the kernel image is copied to the target system using SCP (Linux scp-command or WinSCP for Windows), for example to “/tmp/uImage”. Afterwards the following command has to be executed on the target as user root:
dd if=/tmp/uImage of=/dev/mmcblk0p2 ibs=512 seek=256 conv=sync,notrunc
The target system can be accessed via the serial interface (console) or SSH (Linux ssh-command or Putty for Linux and Windows).
Using a linux workstation this can be done in just one step (supposing the IP addresse of the targets is 172.16.135.170, the kernel image uImage is located in the current directory):
ssh root@172.16.135.170 dd of=/dev/mmcblk0p2 ibs=512 seek=256 conv=sync,notrunc <uImage
At the next restart the system will boot the new kernel.
Firmware reset
In case a complete new firmware image (U-Boot, linux kernel, root filesystem) is to be installed, but the the rescue mode cannot be enabled because the DIP switches are not accessible, a workaround is to invalidate the master boot record (MBR) of the eMMC flash:
- using Linux
dd if=/dev/zero of=/dev/mmcblk0 bs=1024 count=4
- using U-Boot
mw.b $loadaddr 0 1000; mmc write 0 $loadaddr 0 8
Without the linux kernel booting the MFG-Tool can now connect to the system and install a new firmware image.
