Preface
The aim of this guide is to debug a “Hello World” demo on the Cortex-M7 core of the TQMa117xL using VS code and a SEGGER J-Link.
The instructions on this page refer to the TQMa117xL repository and the associated building guide
Keep in mind that the paths specified in these instructions refer to the test system. Your paths may differ.
Keep in mind that the paths specified in these instructions refer to the test system. Your paths may differ.
Prerequisites
Software/Extention Versions
If not already, please install the following Software and install the Serial Console VS-CODE extention listed in the tables below.
| Tool/Extention | Version |
|---|---|
| GitHub Repository | MBa117xL.SW.MCU.BSP |
| VS-Code | Version 1.88.1 |
| Segger J-Link for debugging | Version v8.83 |
ms-vscode.cmake-tools | CMake tools (from Microsoft): v1.16.3 |
marus25.cortex-debug | Cortex-Debug (from marus25): v1.12.0 |
ms-vscode.vscode-serial-monitor | Serial Monitor (from Microsoft): 0.13.1 |
Advice: Check if the 'Status-Bar-Visibility' option by the CMAKE extention is set to 'visible'.
Debugging
Debugging
Debugging
Make sure you installed the CP210x Serial to USB driver. If not, please refer to the instructions Starterkit Quicksteps guide.
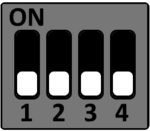
Set the DIP switches of the MBa117xL as follows to debug via JTAG:
DIP-Switch-Settings
S3
S4
S5
S6

- Connect your SEGGER J-Link to JTAG connector X39 on the MBa117xL.
- Connect a Micro USB cable to Serial Debug connector X1.
- Open your MBa117xL workspace in VS-Code and build a example.
- Select
Terminal > New Terminalin the top bar - Finaly debug your desired example following the istructions in the video below: