Install an OS image using the TQ-SD Card
From now (March 2012) on, all starterkits will include an TQ SD card, which allows installing either Linux or Windows onto the onboard eMMC flash.
Preparations
- Insert TQ SD card into SD slot.
- Set DIP switches to “Boot from SD card”:
Boot from SD card 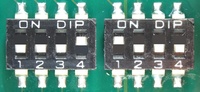
DIP OFF ON S4 1 X S4 2 X S4 3 X S4 4 X S5 1 X S5 2 N/A S5 3 N/A S5 4 N/A - Supply power.
- A preinstalled Linux boots from the SD card.

Installation of an OS image
The installation tool starts automatically and (using the serial console) displays the following menu:
#===========================================#
# TQ Embedded Operating System Installation #
#===========================================#
U-Boot configuration found
Which Operating System?
1) Linux
2) Windows
3) Exit
Type Number:
Entering a number will start the installation of the corresponding OS image and show its progress.
Choosing Exit drops to a bash shell, no modifications are made to the system in this case.
Once the installation is finished the message “Press any key to restart” is displayed.
Restarting the system
Prior to restarting the system the DIP switches have to be set to “Boot from eMMC”:
| Boot from eMMC | ||
|---|---|---|
 |
||
| DIP | OFF | ON |
| S4 1 | X | |
| S4 2 | X | |
| S4 3 | X | |
| S4 4 | X | |
| S5 1 | X | |
| S5 2 | N/A | |
| S5 3 | N/A | |
| S5 4 | N/A | |
The SD card can be removed after shutdown.
Configuring eboot
Only required if Windows CE has been installed
Pressing the space key at the eboot prompt will interrupt the boot process and display eboot's configuration menu.
For Windows CE to boot properly the options
[5] Select Boot Device[K] KITL Enable Mode
have to be set up as follows:
Press [ENTER] to download now or [SPACE] to cancel.

Initiating image download in 1 seconds.
-----------------------------------------------------------------------------
Freescale iMX SOC Menu Item
-----------------------------------------------------------------------------
 [0] IP Address : 192.168.111.10
 [1] Set IP Mask : 255.255.255.0
 [2] Boot Delay : 3
 [3] DHCP : Enabled
 [4] Reset to Factory Default Configuration
 [5] Select Boot Device : NK from SD/MMC
 [6] Set MAC Address : 0-2-B3-92-A8-C4
 [7] Hive based registry : Load form filesys
 [9] Bootloader Shell
 [I] KITL Work Mode : Interrupt
 [K] KITL Enable Mode : Disable
 [P] KITL Passive Mode : Disable
 [S] Save Settings
 [D] Download Image Now
 [L] Launch Existing Flash Resident Image Now
 [E] Select Ether Device : ENET
 [M] MMC and SD Utilities
 [U] Set UUID : 0-0-0-0-0-0-0-0-0-0-0-0-0-0-0-0

 Selection: