This is an old revision of the document!
To reset the BIOS to default values press the reset button of the mainboard 3 times within a second.
Connect a USB stick (FAT32 formatted) to the mainboard
Boot the system into the BIOS menu and move to the desired BIOS screen
Press <F11> to take a screenshot of the actual screen
Select the desired storage device in the pop-up window and press <Enter>
The file will be stored as YYYYMMDDhhmmss.BMP
Connect a USB stick (FAT32 formatted) to the mainboard
Boot the System into the UEFI shell
Press <F11> to take a screenshot of the actual screen
Select the desired storage device in the pop-up window and press <Enter>
To display the BIOS over the serial port in addition to the display output on the Starterkit apply the following steps.
The 'Console Redirection' option for example may be useful for BIOS remote control tasks.
On Starterkit
Connect a null modem cable to the desired serial interface (e.g. SER0)
Boot the system into the BIOS menu
Enable 'Console Redirection' option in the BIOS Menu (Setup Utility > Advanced > Console Redirection > enabled) and the corresponding serial port (e.g. COMA)
Press <F10> to save the settings and reboot the system
On Host PC
Connect the null modem cable to an available serial port
Run your favorite terminal emulator on your Host PC (we recommend TeraTerm Pro)
Configure the serial port according to the table below:
Serial port configuration
| Baudrate | Data bits | Parity | Stop bits | Flow Control |
| 115200 | 8 | none | 1 | none |
⇒ Reboot the Starterkit and use the terminal emulator to set up the BIOS
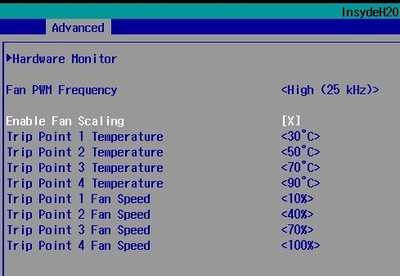
With 'Fan Scaling' option it is possible to control the system temperature at a certain load of the system by setting up the fan speed at certain trip points.
To create a custom 'Fan Scaling' plan apply the following steps in the BIOS setup.
Boot the system into the BIOS menu
Enable 'Fan Scaling' option (Setup Utility > Advanced > SIO Hardware Monitor Nuvoton NCT7802Y > Enable Fan Scaling) and set it up according to your needs
Press <F10> to save the settings and reboot the system
Example
To activate or deactivate CPU cores apply the following settings.
TQMx70EB
Setup Utility > Advanced > CPU Configuration > Active Processor Cores
TQMx60EB
Setup Utility > Advanced > CPU Configuration > Active Processor Cores
TQMx50UC
Setup Utility > Power > Advanced CPU Control > Active Processor Cores
TQMxE39S
Setup Utility > Power > CPU Configuration > Core 0-4 > Enable/Disable
TQMxE39C1
Setup Utility > Power > CPU Configuration > Core 0-4 > Enable/Disable
TQMxE39C2
Setup Utility > Power > CPU Configuration > Core 0-4 > Enable/Disable
TQMxE39M
Setup Utility > Power > CPU Configuration > Core 0-4 > Enable/Disable
TQMxE38C
Setup Utility > Power > Advanced CPU Control > Active Processor Cores
TQMxE38M
Setup Utility > Power > Advanced CPU Control > Active Processor Cores
With 'State after G3' option you can specify the behaviour of the system after power is supplied.
Configuring 'State after G3'
| State | Definition |
| S0 | System starts up directly after power is supplied |
| S5 | System is held in power-off state until power button is pressed |
TQMx70EB
Setup Utility > Advanced > PCH-IO Configuration > State After G3
TQMx60EB
Setup Utility > Advanced > PCH-IO Configuration > State After G3
TQMxE39S
Setup Utility > Advanced > South Cluster Configuration > Miscellaneous Configuration > State After G3
TQMxE39C1
Setup Utility > Advanced > South Cluster Configuration > Miscellaneous Configuration > State After G3
TQMxE39C2
Setup Utility > Advanced > South Cluster Configuration > Miscellaneous Configuration > State After G3
TQMxE39M
Setup Utility > Advanced > South Cluster Configuration > Miscellaneous Configuration > State After G3
TQMxE38C
Setup Utility > Advanced > Miscellaneous Configuration > State After G3
TQMxE38M
Setup Utility > Advanced > Miscellaneous Configuration > State After G3
TQ provides tools from Insyde® for the UEFI BIOS which allows the customization of the BIOS.
Please Note: The following Tools are only available on request.
For further Information please contact Support.
Further Tools are only available from Insyde®:
The H2OFFT (Firmware Flash Tool) to perform BIOS updates under supported OS environment.
Prerequisites
Update BIOS via EFI-Shell
1. Unzip BIOS-Tools ZIP file and copy the following to the USB stick:
Example:
<USB-Stick>
    |--- H2OFFT-Sx64.efi
    |--- TQMx80UC_05.23.45.15.02.bin
Please note for TQMx80UC / TQMx60EB / TQMx70EB you first have to enable 'Me FW Image Re-Flash' option in the BIOS Menu:
(Setup Utility > Advanced > PCH-FW Configuration > Firmware Update Configuration > Me FW Image Re-Flash > enabled)
2. Insert the prepared USB Stick to a Starterkit USB port
3. Boot up the system and navigate into the EFI Shell (Boot Manager > Internal EFI Shell)
4. After starting the EFI Shell switch path to the USB stick by typing fs0:.This depends on the amount of conected mass storage devices; with command ls you can check the content of the path.
5. The following command examples shows how to use the H2OFFT Tool.
--------------------------------
TQMx80UC:
--------------------------------
Shell> H2OFFT-Sx64.efi <BIOS_file.bin> –ME –DESC –BIOS –ALL -RA -SRC

Example:
Shell> H2OFFT-Sx64.efi TQMx80UC_05.23.45.15.02.bin –ME –DESC –BIOS –ALL -RA -SRC


--------------------------------
TQMx60EB / TQMx70EB :
--------------------------------
Shell> H2OFFT-Sx64.efi <BIOS_file.bin> –ME –DESC –BIOS –ALL -RA

Example:
Shell> H2OFFT-Sx64.efi TQMx60_70EB_5.12.09.53.15.bin –ME –DESC –BIOS –ALL -RA


-------------------------------------------------------------------
TQMxE39M / TQMxE39C1/2 / TQMxE39S / TQMx50UC / TQMxE38M / TQMxE38C :
-------------------------------------------------------------------
Shell> H2OFFT-Sx64.efi <BIOS_file.bin> –ALL -RA

Example:
Shell> H2OFFT-Sx64.efi TQMxE39M_5.12.30.21.12.bin –ALL -RA
Update BIOS on Windows
1. Unzip BIOS-Tools ZIP file and copy the following to the USB stick:
Example:
<USB-Stick>
    |--- InsydeH2OFFT_x86_WINx64_*
          |-- TQMx80UC_05.23.45.15.02.bin
2. Insert the prepared USB Stick to a Starterkit USB port
3. Boot up the system and run Command Prompt as administrator
4. Switch path to the InsydeH2OFFT_x86_WIN64_* folder.
5. Following generic commands shows how to start the BIOS Update for TQMx86 modules.
--------------------------------
TQMx80UC:
--------------------------------
> H2OFFT-Wx64 <BIOS_file.bin> –ME –DESC –BIOS –ALL -RA -SRC

Example:
> H2OFFT-Wx64 TQMx80UC_05.23.45.15.02.bin –ME –DESC –BIOS –ALL -RA -SRC


--------------------------------
TQMx60EB / TQMx70EB :
--------------------------------
> H2OFFT-Wx64 <BIOS_file.bin> –ME –DESC –BIOS –ALL -RA

Example:
> H2OFFT-Wx64 TQMx60_70EB_5.12.09.53.15.bin –ME –DESC –BIOS –ALL -RA


-------------------------------------------------------------------
TQMxE39M / TQMxE39C1/2 / TQMxE39S / TQMx50UC / TQMxE38M / TQMxE38C :
-------------------------------------------------------------------
> H2OFFT-Wx64 <BIOS_file.bin> –ALL -RA

Example:
> H2OFFT-Wx64 TQMxE39M_5.12.30.21.12.bin –ALL -RA
Update BIOS on Linux
1. Unzip BIOS-Tools ZIP file and copy the following to the USB stick:
Example:
<USB-Stick>
    |--- InsydeH2OFFT_x86_LINUX64_*
    |--  TQMx80UC_05.23.45.15.02.bin
2. Insert the prepared USB Stick to a Starterkit USB port
3. Boot up the system and open terminal
4. Switch path to the InsydeH2OFFT_x86_LINUX64_* folder
5. Extract tar package tar -xvf InsydeH2OFFT_x86_LINUX64_portable_*.tar.bz2
6. Install H2OFFT Tool sudo dpkg -i InsydeH2OFFT_x86_LINUX64_*.deb
$ cd /var/local/insyde/H2OFFT/driver/
$ sudo -E make
$ sudo -E make install
$ sudo apt-get install
7. Run following generic commands shows how to start the BIOS Update for TQMx86 modules.
--------------------------------
TQMx80UC:
--------------------------------
$ sudo h2offt-lx64 <BIOS_file.bin> –ME –DESC –BIOS –ALL -RA -SRC

Example:
$ sudo h2offt-lx64 TQMx80UC_05.23.45.15.02.bin –ME –DESC –BIOS –ALL -RA -SRC


--------------------------------
TQMx60EB / TQMx70EB :
--------------------------------
$ sudo h2offt-lx64 <BIOS_file.bin> –ME –DESC –BIOS –ALL -RA

Example:
$ sudo h2offt-lx64 TQMx60_70EB_5.12.09.53.15.bin –ME –DESC –BIOS –ALL -RA


-------------------------------------------------------------------
TQMxE39M / TQMxE39C1/2 / TQMxE39S / TQMx50UC / TQMxE38M / TQMxE38C :
-------------------------------------------------------------------
$ sudo h2offt-lx64 <BIOS_file.bin> –ALL -RA

Example:
$ sudo h2offt-lx64 TQMxE39M_5.12.30.21.12.bin –ALL -RA
The H2OUVE (UEFI Variable Editor) allows to edit setup settings and variable data of the BIOS Image.
Prerequisites
Using H2OUVE in the EFI-Shell
1. Unzip BIOS-Tools ZIP file and copy the following to the USB stick:
Example:
<USB-Stick>
    |--- H2OUVE-Sx64.efi
    |--- TQMx80UC_05.23.45.15.02.bin
2. Insert the prepared USB Stick to a Starterkit USB port
3. Boot up the system and navigate into the EFI Shell (Boot Manager > Internal EFI Shell)
4. After starting the EFI Shell switch path to the USB stick by typing fs0:.This depends on the amount of conected mass storage devices; with command ls you can check the content of the path.
5. The following command examples shows how to use the H2OUVE Tool.
Examples:
Print out help message:
Shell> H2OUVE-Sx64.efi -h

Print out BIOS supported functionalities:
Shell> H2OUVE-Sx64.efi -fea

Remove a variable by name:
Shell> H2OUVE-Sx64.efi -re -vn SioTqmx86Setup00

Dump variable information to a variable record file:
Shell> H2OUVE-Wx64.efi -gv testfile

Update variables from specified variable record file:
Shell> H2OUVE-Wx64.efi -sv testfile
Using H2OUVE on Windows
1. Unzip BIOS-Tools ZIP file and copy the following to the USB stick:
Example:
<USB-Stick>
    |--- InsydeH2OUVE_x86_WINx64_*
          |-- TQMx80UC_05.23.45.15.02.bin
2. Insert the prepared USB Stick to a Starterkit USB port
3. Boot up the system and run Command Prompt as administrator
4. Switch path to the InsydeH2OUVE_x86_WINx64_* folder.
5. Following command examples shows how to use the H2OUVE Tool.
Examples:
Print out help message:
> H2OUVE-Wx64 -h

Print out BIOS supported functionalities:
> H2OUVE-Wx64 -fea

Remove a variable by name:
> H2OUVE-Wx64 -re -vn SioTqmx86Setup00

Dump variable information to a variable record file:
> H2OUVE-Wx64 -gv testfile

Update variables from specified variable record file:
> H2OUVE-Wx64 -sv testfile
Using H2OUVE on Linux
1. Unzip BIOS-Tools ZIP file and copy the following to the USB stick:
Example:
<USB-Stick>
    |--- InsydeH2OUVE_x86_LINUX64_*
    |--  TQMx80UC_05.23.45.15.02.bin
2. Insert the prepared USB Stick to a Starterkit USB port
3. Boot up the system and open terminal
4. Switch path to the InsydeH2OUVE_x86_LINUX64_* folder
5.Extract package tar -xvf InsydeH2OUVE_x86_LINUX64_portable_.tar.bz2
6. Install H2OUVE Tool sudo dpkg -i InsydeH2OUVE_x86_LINUX64_*.deb
$ cd /var/local/insyde/H2OUVE/driver/
$ sudo -E make
$ sudo -E make install
$ sudo apt-get install
7. Run following generic commands shows how to start the BIOS Update for TQMx86 modules.
Examples:
Print out help message:
$ sudo h2ouve-lx64 -h

Print out BIOS supported functionalities:
$ sudo h2ouve-lx64 -fea

Remove a variable by name:
$ sudo h2ouve-lx64 -re -vn SioTqmx86Setup00

Dump variable information to a variable record file:
$ sudo h2ouve-lx64 -gv testfile

Update variables from specified variable record file:
$ sudo h2ouve-lx64 -sv testfile
This instructions guide you through the procedure of replacing the Bootlogo in EFI-Shell, Windows and Linux.
The H2OLRT (Logo Replacement Tool) generates a BIOS file that contains the desired Boot Logo instead of the TQ Logo.
Prerequisites
Replace Boot Logo via EFI Shell
1. Unzip BIOS-Tools ZIP file and copy the following to the USB stick:
Example:
<USB-Stick>
    |--- H2OLRT-Sx64.efi
    |--- TQMx80UC_05.23.45.15.02.bin
    |--- example_picture.jpg
2. Insert the prepared USB Stick to a Starterkit USB port
3. Boot up the system and navigate into the EFI Shell (Boot Manager > Internal EFI Shell)
4. After starting the EFI Shell switch path to the USB stick by typing fs0:.This depends on the amount of conected mass storage devices; with command ls you can check the content of the path.
5. The generic command and the following example shows how to start the Logo Replacement.
H2OLRT-Sx64.efi –replogo:<SrcBIOSImageName> –logopath:<LogoImagePathName> -logoindex:<IndexNum> –logoconvert:<ConvertNum> –out:<OutBIOSImageName>
Example:
H2OLRT-Sx64.efi –replogo:TQMx80UC_05.23.45.15.02.bin –logopath:example_picture.jpg -logoindex:4 –logoconvert:1 –out:TQMx80UC_05.23.45.15.02_new.bin
H2OLRT-Sx64.efi Variable description
| Variable | Description |
| <SrcBIOSImageName> | BIOS file in which the logo should be replaced |
| <LogoImagePathName> | Path and name of the replacement picture |
| <IndexNum> | Default index, where the picture must be stored.
Logoindex TQMx60EB / TQMx70EB / TQMx50UC = 4
Logoindex TQMxE39S / TQMxE39C1/2 / TQMxE39M / TQMx80UC = 1
Logoindex TQMxE38M / TQMxE38C = 0 |
| <ConvertNum> | 0 = keep original image's format and dimension.
1 [default] = auto convert the image's format and dimension. |
| <OutBIOSImageName> | path and name of the generated BIOS file |