Table of Contents
Embedded module TQMa117xL
This guide describes how to flash an already built hello_world_demo to STKa117xL using NXPs MCUXpresso Secure Provisioning Tool.
Prerequisites
- Segger J-Link Debug Probe
- Demo Artefacts built according to the Building a Demo Guide
- An NXP Account for the MCUXpresso Secure Provisioning Tool (v.26.03)
Preface
Download and install NXPs Secure Provisioning Tool. An NXP Account is necessary to download the Software.
Build the Demo according to the Guide. Use the build configurations flexspi_nor_debug or flexspi_nor_release. The resulting artefact will be adjusted and flashed to SPI-NOR of TQMa117xL.
Flash to SPI-NOR on TQMa117xL
- Use the following DIP switch configuration to put the board into serial downloader mode.
Serial Downloader
S3
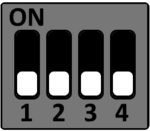
S4
S5
S6

- Open the Secure Provisioning Tool and create a new workspace. Select a location and choose the correct processor (e.g. MIMXRT1176 (RT1170-EVKB)), then click “create”.

- Select the processor menu in the top left corner.

- Pick the correct processor.

- Select the programming interface menu.

- Pick UART as connection type and set the COM port to the one that is used for the target hardware connection. Set the baud rate to 115200. Check the connection with the “Test Connection” button afterwards.

- Go into the boot memory configuration.

- Configure the parameters like the following.

- Swap to the “Build image” tab and select the
hello_world_cm7.elf, then click “Build Image”.

- Swap to the “Write image” tab. The correct image (./bootable_images/hello_world_cm7.bin) should be selected already. Click “Write Image”.

- Open a serial terminal, select the COM Port of the target and a baud rate of 115200.
- Power off the board and select the SPI boot mode using the following DIP switch configuration:
SPI Boot
S3
S4
S5
S6

- When powering on the board now, the serial terminal should print a “hello world” message.
This guide describes how to prepare, build and run a Cortex-M7 MCUXpresso hello world demo on STKa117xL with Windows and Linux.
Unless otherwise specified, the commands apply to both operating systems.
Prerequisites
- Segger J-Link Debug Probe
- Windows 10/11 or Ubuntu 22.04 and above
Prepare Host System
Set up Workspace
Go to the root workspace directory and then clone the Git Repository:
git clone https://github.com/tq-systems/mcuxsdk-examples-tq.git
Install necessary dependencies for the SDK:
pip install ninja jsonschema cmake west
pip install -r mcuxsdk-examples-tq/scripts/requirements.txt
Initialize the workspace
west init --local mcuxsdk-examples-tq
west update
Note: If the installed commands (e.g. west) are not recognized, their location needs to be added to PATH first.
For Windows, add the following to the system environment:
C:/Users/<Username>/AppData/Roaming/Python/Python3x/Scripts

For Linux, execute:
export PATH=$PATH:$HOME/.local/bin
Compile the Demo
Remove old builds if necessary
Build the demo
west build -b tqma117xl-mba117xl mcuxsdk-examples-tq/_boards/tqma117xl-mba117xl/examples/demo_apps/hello_world/ -Dcore_id=cm7 -DCUSTOM_BOARD_ROOT="mcuxsdk-examples-tq/_boards" --config=debug
The final build is located in ~/build/hello_world_cm7.elf.
