Table of Contents
TQMa62xx - YOCTO Linux BSP documentation
Preface
The goal is to create a reproducible build chain for the “Hello World” and “RPMsg Echo” demos on the TQMa62xx (AM6254)'s Cortex-M4F core using TI's Code Composer Studio under Windows 11.
The following regarding the OS is necessary:
- Windows 11 (64-bit), kept up-to-date.
- Administrator rights for tool installations and system changes.
Keep in mind that the paths specified in these instructions refer to the test system. Actual paths may differ.
All TI tools should be installed to the same root directory under:
C:\ti\
Use the exact versions listed unless otherwise indicated — other versions may lead to unexpected behavior.
Prerequisites
Software Versions
Building under Windows has been tested with the following software and versions.
| Tool | Version |
|---|---|
| GitHub Repository | m4-examples-for-tqma62xx |
| TI Code Composer Studio | v20.3.1 |
| TI MCU-PLUS-SDK-AM62x | v11.00.00.16 |
| TI SysConfig | v1.25.0 |
| TI Clang | v4.0.4.LTS (bundled with CCS) |
| Arm GNU Toolchain | 9.2-2019.12 |
| Python | v3.10 |
| Rufus (SD card flashing) | v4.13 |
| Tera Term (or any serial monitor) | v4.106 |
Hardware
The following hardware is required for building, flashing, and running the examples.
| Hardware | Description | Pin Reference |
|---|---|---|
| Micro USB cable | Connects the board to the PC for communication and flashing. | X7 |
| TI XDS110 | Used for debugging and programming the Cortex-M4F core. | X29 |
| Personal Computer | Windows 11 PC for programming and interacting with the board. | - |
| Power Supply | 24 V DC supply required to power the board. | X5 |
| USB to UART | Cortex-M4F demos use UART5, available on connector X27. | X27 |
Setup Host System and CCS
Setup
C:\ti\
.
Install Tools & Dependencies
- Git (latest version):
- Download: https://git-scm.com/download/win
- Installation: Default settings, ensure Git is added to PATH.
- After installation, open Git Bash or PowerShell and run:
git config --global core.longpaths true
(to minimize issues with long paths during Git operations).
- Python (Version 3.10):
- Installation: Default settings
- Important: Enable “Add Python to PATH” or “Add python.exe to PATH”.
- TI Code Composer Studio v20.3.1:
- Install to
C:\ti\ccs2031(or the version-matching default). - During installation, select support for Sitara AMx Processors so that AM62x device support is included.
- TI Clang (v4.0.4.LTS) is bundled with CCS — no separate installation required.
- TI MCU-PLUS-SDK-AM62x v11.00.00.16:
- Install to
C:\ti\mcu_plus_sdk_am62x_11_00_00_16
- TI SysConfig v1.25.0:
- Install to
C:\ti\sysconfig_1.25.0
- Arm GNU Toolchain 9.2-2019.12:
- Download: Arm Developer Website (Version 9.2-2019.12 for AArch64 bare-metal, Windows mingw-w64-i686 archive).
- Installation: Create
C:\ti\if it does not exist and extract the archive there. The path should be:C:\ti\gcc-arm-9.2-2019.12-mingw-w64-i686-aarch64-none-elf
Set Environment Variables
The Arm GNU Toolchain is not picked up automatically and must be added to the system PATH.
- Windows key, type “Environment Variables”, select “Edit the system environment variables”.
- Click the button “Environment Variables…”.
- Under User variables (or System variables for all users), select the entry Path and click “Edit…”.
- Click “New” and add the following entry:
C:\ti\gcc-arm-9.2-2019.12-mingw-w64-i686-aarch64-none-elf\bin
- Confirm all dialogs with “OK”.
gcc-arm-9.2-2019.12-mingw-w64-i686-aarch64-none-elf (AArch64 bare-metal).
Setting ARMGCC_DIR is not required for this project — CCS manages its own toolchain paths. Only the PATH entry above is needed so that helper tools from the MCU-PLUS-SDK build chain can locate 'aarch64-none-elf-gcc'.
Rufus & Tera Term (for SD card flashing and serial console):
- Rufus: https://rufus.ie (v4.13 or newer)
Check
The Arm GNU Toolchain is the only component that is not picked up automatically by CCS. To make sure it is callable from a fresh PowerShell session, run:
Get-Command aarch64-none-elf-gcc | Select-Object -ExpandProperty Source
Get-Command python | Select-Object -ExpandProperty Source
If everything is correct, the output should look something like this:
PS C:\Users\TQ-Embedded> Get-Command aarch64-none-elf-gcc | Select-Object -ExpandProperty Source
C:\ti\gcc-arm-9.2-2019.12-mingw-w64-i686-aarch64-none-elf\bin\aarch64-none-elf-gcc.exe
PS C:\Users\TQ-Embedded> Get-Command python | Select-Object -ExpandProperty Source
C:\Users\TQ-Embedded\AppData\Local\Programs\Python\Python310\python.exe
If aarch64-none-elf-gcc is not found, add C:\ti\gcc-arm-9.2-2019.12-mingw-w64-i686-aarch64-none-elf\bin to the system PATH and reopen the terminal.
Setup Project
Setup Project
Create Workspace
mkdir C:\workspace
cd C:\workspace
Clone the TQMa62xx M4 examples repository:
git clone <repository-url>/m4-examples-for-tqma62xx.git
cd m4-examples-for-tqma62xx
Import the Projects into CCS
The repository contains two example projects: hello_world and ipc_rpmsg_echo_linux. Both are imported as standalone CCS projects.
- Open Code Composer Studio.
- In the upper-left corner of the IDE, click Import Projects.
- Browse to
C:\workspace\m4-examples-for-tqma62xx
- Both example projects should be auto-detected. Select both.
- Choose an import destination → select “Copy imported projects into: workspace_csstheia”.
- Click Finish.
Verify Project Settings
Before building, verify that the toolchain and SDK paths are correct for each imported project.
- Right-click a project → Properties.
- Under CCS General, check that:
- The compiler version matches TI Clang v4.0.4.LTS.
- The MCU-PLUS-SDK path points to
C:\ti\mcu_plus_sdk_am62x_11_00_00_16(Dependencies tab) - The SysConfig path points to
C:\ti\sysconfig_1.25.0(Dependencies tab)
- Repeat for the second project.
.syscfg) files. SysConfig is launched automatically by the build system when needed.
Building examples
Building
After fulfilling the preparations, both example projects should be visible in the Project Explorer view of CCS.
- Select the desired project in the Project Explorer.
- Open the Project menu and choose Build Project, or click the hammer icon in the toolbar (rightclick desired project).
- The generated build artifacts will be placed under
m4-examples-for-tqma62xx\<project>\Debug\(orRelease\).- To switch between Debug and Release, click “Project” in the top bar and change the “Build Configuration”.
- The relevant output for flashing is the stripped binary, e.g.
hello_world.mcu-m4f0_0.strip.out.
Both projects can be built in one go via Project → Build All.

Yocto BSP Image (RPMsg-enabled)
Yocto BSP
The Cortex-M4F demos require a Linux BSP image with RPMsg support running on the Cortex-A53 cores.
Required local.conf Settings
The following entries are required to enable RPMsg communication with the Cortex-M4F core:
# RPMsg userspace tooling and char driver support
IMAGE_INSTALL:append = " \
    ti-rpmsg-char \
"
Required Kernel Configuration
The following Kconfig symbols must be enabled in the kernel (as built-in or module), please refer to the https://support.tq-group.com/en/arm/tqma62xx/linux/yocto/how-to/yocto_build_system#configuring-the-kernel guide to find out how to configure your kernel:
CONFIG_RPMSG
CONFIG_RPMSG_CHAR
CONFIG_RPMSG_CTRL
CONFIG_RPMSG_NS
CONFIG_RPMSG_VIRTIO
CONFIG_REMOTEPROC
Deployment
Deployment
UART Settings
| Setting | Value |
|---|---|
| Baud Rate | 115200 bps |
| Data Bits | 8 bits |
| Parity | None |
| Stop Bits | 1 |
| Flow Control | None |
| New Line Char | CR+LF |
| Local Echo | Enabled (recommended) |
For all communication with the board the UART settings from the left table are used. The Cortex-M4F is configured to use UART5 (
PR0_UART0_TXD/A56 & PR0_UART0_RXD/A57) for both examples. To use UART5 follow the steps below.
- Connect USB Serial TTL converter TX pin to the RX pin on connector X27-7.
- Connect USB Serial TTL converter RX pin to the TX pin on connector X27-5.
- Connect USB Serial TTL converter GND pin to the GND pin on connector X27-3.
- Connect USB Serial TTL converter to the PC.
Preparing the Linux Boot SD card
- Get the Linux
.wicimage of the BSP (see Yocto BSP Image). - Use Rufus to flash the
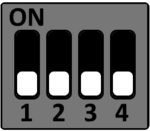
.wicimage onto an SD card. - Set the DIP switches as follows to boot from SD card:
SD-Card
S3
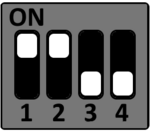
S4
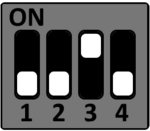
S5
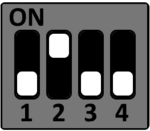
S6
Booting from SD-Card
- Connect the board to the PC via micro-USB to USB 2.0.
- Open Tera Term with the UART settings above.
- Power up the board. The boot log should appear on the terminal.
Flashing the Cortex-M4F Firmware
Using prebuilt firmware from the BSP
/sys/class/remoteproc/remoteprocX) depends on the DT probe order and may differ between BSP versions. The Cortex-M4F is the node whose device symlink points to 5000000.m4fss. Determine the correct node with:
for r in /sys/class/remoteproc/remoteproc*; do
    echo "$(basename $r): $(basename $(readlink $r/device))"
done
All examples below assume the M4F is remoteproc2. Substitute the actual node found on the running system.
- Copy the built binary (e.g.
hello_world.out) to the target device — for example viascpor an external USB stick. - On the target, copy the binary to
/lib/firmware/. The file must reside directly under/lib/firmware/— subdirectories or other mount points are not searched by the kernel:
cp /path/to/hello_world.out /lib/firmware/
ls -la /lib/firmware/hello_world.out
- Open Tera Term on the Cortex-M4F UART (UART5) using the settings above.
- If the Cortex-M4F was started before with a different firmware, stop it first. Errors from this command can be ignored — they only mean the core is not currently running:
echo hello_world.out > /sys/class/remoteproc/remoteproc2/firmware
echo stop > /sys/class/remoteproc/remoteproc2/state 2>/dev/null
echo start > /sys/class/remoteproc/remoteproc2/state
- Verify the core's state:
cat /sys/class/remoteproc/remoteproc2/state
# Expected output: running
echo start fails with No such file or directory or Invalid argument, the firmware path is wrong or remoteproc is in an error state. Inspect dmesg | tail -20 directly after the failed start — the kernel logs the exact reason (firmware not found, invalid ELF, memory region mismatch, …).
For hello_world, the following will be printed on the Cortex-M4F UART terminal and both user LEDs will blink:
MBa62XX_TQMa62xx
Hello World! from Cortex-M4F
For ipc_rpmsg_echo_linux, the following will be printed:
MBa62XX_TQMa62xx RPMSG Demo.
[IPC RPMSG ECHO] Version: REL.MCUSDK.K3.11.00.00.16+ (Apr  9 2026 14:55:33):
[IPC RPMSG ECHO] Remote Core waiting for messages at end point 13 ... !!!
[IPC RPMSG ECHO] Remote Core waiting for messages at end point 14 ... !!!
The Cortex-M4F now waits on endpoints 13 and 14 for messages.
Running the RPMsg Demo Test
- Flash the RPMsg test demo as described above.
- On the Linux terminal, run:
rpmsg_char_simple -r 9 -n 10
rpmsg_char_simple sees the Cortex-M4F as rproc 9. The tool and the necessary drivers are part of the BSP.
The output on the Linux terminal should look like this:
Created endpt device rpmsg-char-9-384, fd = 3 port = 1025
Exchanging 10 messages with rpmsg device rpmsg-char-9-384 on rproc id 9 ...

Sending message #0: hello there 0!
hello there 0!
...
Sending message #9: hello there 9!
hello there 9!

Communicated 10 messages successfully on rpmsg-char-9-384

TEST STATUS: PASSED
Debugging
- Connect all necessary hardware to the board (see Hardware).
- Select the project in the CCS Project Explorer.
- Open the Run menu and choose Debug Project.
- In the Debug Core Selection window, select core
BLAZAR_Cortex_M4F_0. - The target configuration
AM62X_XDS110.ccxmlis built automatically and saved underC:\Users\<username>\ti\CCSTargetConfigurations.
The debug session starts and the processor halts on main.