Visual Studio Code
Visual Studio Code (VS Code) is a free, open source development environment developed by Microsoft and optimized for many programming languages such as C, C++, C# and Python. One of the most important features of VS Code is its support for IntelliSense, a code completion and debugging technology. In the context of building C programs and including them in the Yocto build system, VS Code offers a number of extensions and tools that help developers perform their work more efficiently and accurately. Below we will describe the steps to build C programs with VS Code and how to integrate them into the Yocto build system.
Knowledge Requirements
This tutorial requires basic knowledge of the programming languages C/C++ and Make.
Tested Software/Hardware
This tutorial is tested on Ubuntu 22.04 as host system with the TQMa8MPxL as target module.
However, the procedure is the same for other modules.
Install VS Code
Visual Studio is available for many different platforms such as Linux, Windows and MacOS. In this tutorial we will use the tool on Linux (Ubuntu), but the procedures will be similar for all platforms.
It is available for download from the official website:
https://code.visualstudio.com/
Install VS Code C/C++ extension
The C/C++ extension in Visual Studio Code allows developers to write, edit, and debug C/C++ code directly in VSCode. It provides features such as IntelliSense (code completion), code formatting, syntax checking, support for multiple compilers, and the ability to create and manage C++ projects. In addition, it also allows controlling build and debug processes through the integrated terminal.
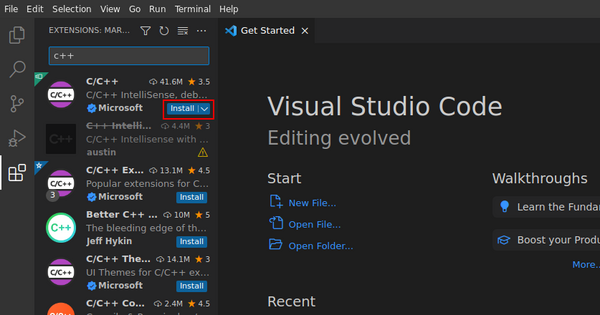
The installation is done via the built-in extension management of VS Code:
1. Open the extensions menu or use the keyboard shortcut Ctrl+Shift+x to open it
2. Search for the extension C/C++ from Microsoft
3. Klick Install
Alternatively it can be installed via the Linux CLI:
code --install-extension ms-vscode.cpptools
Linux host dependencies
Some Dependencies are required on the Linux host.
Under Ubuntu these can be installed as follows:
sudo apt install build-essential gdb gdb-multiarch
Setup for ARM
The source code can be compiled for different platforms. It is important that the correct cross compiler is used.
Below we explain how to install and use the ARM compilers for our embedded modules.
SDK Installation
For the next steps the appropriate ARM compilers are needed. These can be found in the Yocto-SDK of the corresponding module. If you have already built the BSP, the SDK can be built with the following command:
bitbake -c populate_sdk <IMAGE>
After building the toolchain, a script file is generated, which must be executed on the host system to install the toolchain. More information about building the SDK can be found in the HowTo > Development Host section of the corresponding module.
Create and build Project
Our project files are all created in a project folder. The first thing we need to do is create this folder in your workspace:
mkdir hello_world
After creating the folder we can open it in VSCode under File > Open Folder….
Next we create the main sourcefile main.cpp under File > new File… or by pressing Alt + Ctrl + N Next, we create the main source file main.cpp and fill it with the following sample source code:
- main.cpp
#include <stdio.h>

int main(int argc, char *argv[]) {
    printf("Hello, World!\n");
    return 0;
}
Immediately after inserting the code, VSCode should show an error on the first #include because it does not know where the include files are located.
To make the error disappear, we have to tell VSCode where the include files are located. For this we create the folder .vscode in the root directory of the folder and in it the file c_cpp_properties.json with the following content:
- c_cpp_properties.json
{
    "configurations": [
        {
            "name": "Linux",
            "compilerPath": "",
            "intelliSenseMode": "linux-gcc-arm64",
            "includePath": [
                "${workspaceFolder}/**",
                "${SDKTARGETSYSROOT}/usr/include/**"
            ]
        }
    ],
    "version": 4
}
In the next file we set the IP of our target device. To find out the IP, run ifconfig command on target.
Create a settings.json file in the .vscode folder, fill it with the following and modify the IP:
- settings.json
{
    "TARGET": {
        "IP": "192.168.1.100"
    },
    "C_Cpp.errorSquiggles": "disabled"
}
In order for VSCode to know what to run when the Run button is clicked, we need to configure the task. This is done in the new file tasks.json in the .vscode folder. Note that before building, the correct environment variables from the cross compiler need to be sourced. That can be performed directly in “command”:
- tasks.json
{
    "version": "2.0.0",
    "tasks": [
        {
            "label": "build all",
            "type": "shell",
            "command": "source /opt/dumpling-wayland-nxp/3.3.6/environment-setup-cortexa53-crypto-tq-linux; make clean; make -j$(nproc)",
            "problemMatcher": [],
            "group": {
                "kind": "build",
                "isDefault": true
            }
        },
    ]
}
To compile the program, we have to tell the compiler what to do. This is done via a Makefile which is created in the root folder (not .vscode):
- Makefile
#build all
all: main.cpp
	$(CXX) $(CXXFLAGS) -Og main.cpp -g -o helloworld.bin
#clean build result
clean:
	rm -f helloworld.bin
The project is now set up and ready to be built. The build process can be started via the entry Terminal > Run Build Task or by pressing Ctrl+Shift+b.
Deploy and debug on Target
Deploying the program to the target works via scp and for debugging the own application via the GDB debugger.
Deploy over terminal
VSCode offers the option to start a terminal session directly in the program. This function makes it unnecessary to switch between different terminal windows and offers the possibility to copy the previously built binary directly from the terminal to the target with scp. To open a new terminal, goto Terminal > New Terminal. the new terminal opens directly in the project folder and allows you to deploy the software to the target using the following command:
scp helloworld.bin root@<Target IP>:/root/
The built executable is sent to the /root/ directory of the running target over scp. It can then be executed from the console of the target.
./helloworld.bin
Tip
In VS Code, several terminals can be started simultaneously. One of them can be used for SSH connection to the target. Thus, the program on the target can also be executed immediately via the build host via the SSH connection.
Deploy and Debug over VSCode
For debugging your own program, it is a good idea to automate the deploy process. In the following we do this via a bash script, which does the task automatically.
We create a script file named deploy.sh in the project folder with the following content:
- deploy.sh
#!/bin/bash

TARGET_IP="$1"

# stop gdbserver and delete old binary on target
echo "Deploy program on target"
ssh root@${TARGET_IP} "sh -c '/usr/bin/killall -q gdbserver; rm -rf /root/helloworld.bin  exit 0'"

# deploy program to the target
scp helloworld.bin root@${TARGET_IP}:/root/

# start gdbserver on target
echo "Run progran with gdb on target"
ssh -t root@${TARGET_IP} "sh -c 'cd /root/; gdbserver localhost:3000 helloworld.bin'"
important
The output of the “echo” commands is relevant for the following process. When adjusting the “echo” output, the “tasks.json” file must also be adjusted.
In order for VSCode to know what to do when debugging the application, we need to create the launch.json file in the .vscode folder and configure it accordingly:
- launch.json
{
    "version": "0.2.0",
    "configurations": [{
        "name": "Debug",
        "type": "cppdbg",
        "request": "launch",
        "program": "helloworld.bin",
        "stopAtEntry": true,
        "cwd": "${workspaceFolder}",
        "MIMode": "gdb",
        "targetArchitecture": "arm64",
        "preLaunchTask": "deploy",
        "miDebuggerPath": "/usr/bin/gdb-multiarch",
        "miDebuggerServerAddress": "${config:TARGET.IP}:3000",
    }]
}
Finally, we need to add our deploy script and debugging process to tasks.json. The completed tasks.json looks like this:
- tasks.json
{
    "version": "2.0.0",
    "tasks": [
        {
            "label": "build all",
            "type": "shell",
            "command": "source /opt/dumpling-wayland-nxp/3.3.6/environment-setup-cortexa53-crypto-tq-linux; make clean; make -j$(nproc)",
            "problemMatcher": [
                "$gcc"
            ],
            "group": {
                "kind": "build",
                "isDefault": true
            }
        },
        {
            "label": "deploy",
            "isBackground": true,
            "problemMatcher":{
                "base": "$gcc",
                "background": {
                    "activeOnStart": true,
                    "beginsPattern":  "Deploy program on target",
                    "endsPattern":  "Run progran with gdb on target"
                }
            },
            "type": "shell",
            "command": "sh",
            "args": [
                "deploy.sh",
                "${config:TARGET.IP}"
            ],
            "dependsOn": ["build all"],
        }
    ]
}
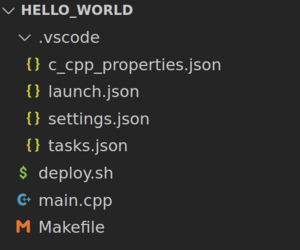
The project folder should contain the following files:
Now debugging the application is fully prepared.
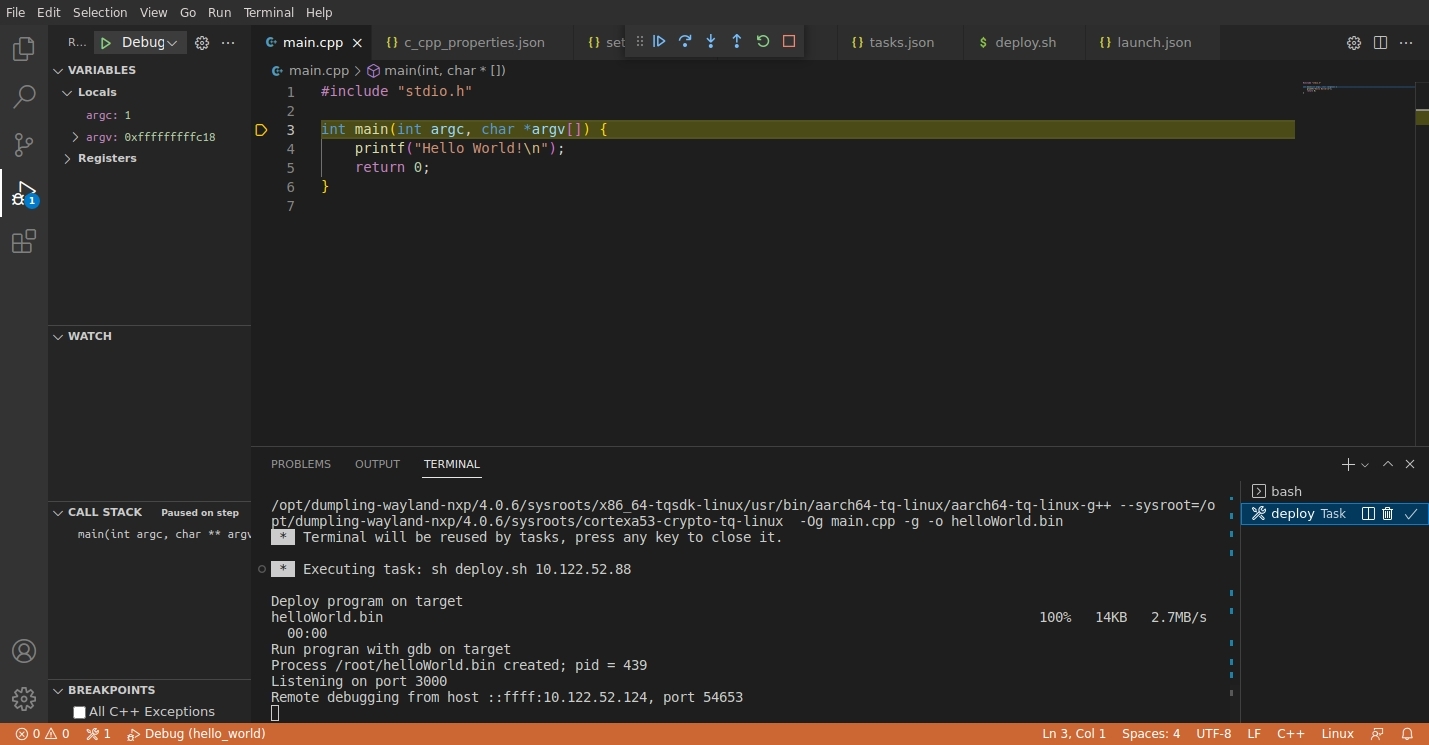
Start debugging
The debugging of the application can be started via Run > Start Debugging or via the F5 key.