Build System
PTXdist
The following applies to
- PTXdist 2012.07 (BSP 0102 / 0106)
- PTXdist 2012.04 (BSP 0100 / 0101)
Always use the PTXdist version the BSP was developed for.
Preparing the development host
Please note:
Ubuntu 10.04 or newer required for the toolchain.
To install PTXdist you need a Linux OS like Ubuntu. The BSP needs some additional packages which are normally not installed. These packages are:
- autoconf
- bc
- gawk
- dialog
- ncurses-dev
- bison
- flex
- quilt
- texinfo
- gettext
- g++
- libxml-parser-perl
- zip
For development it is also recommended to have a tftp server for image download and update and an nfs server for network mounted rootfs configured and running.
Please make sure you have the following three components downloaded to your development machine. Otherwise see the download section for links.
- PTXdist 2011.11 (Build System for Toolchain)
- OSELAS Toolchain 2011.11.3 (Toolchain project)
- PTXdist 2012.07 (Build System for Linux BSP)
- TQ ARM BSP REV0106 (Linux BSP)
Build system installation
Always use the buildsystem version the BSP was developed for.
First install the toolchain's ptxdist, then compile toolchain, then install BSP's ptxdist.
Later you can select which ptxdist to use by calling ptxdist-<version>.
Example:
$ ptxdist-2012.07.0 version
The link ptxdist always calls the most recently installed ptxdist version.
After installing all packages on the host machine, extract, configure, compile and install the PTXdist sources.
See download page for links.
Extract the package ptxdist-<version>.tar.bz2 to a temporary directory and call in that directory:
$ ./configure
$ make
$ sudo make install
This will install PTXdist to /usr/local/lib by default. Afterwards please setup PTXdist with:
$ ptxdist setup
In PTXdist menu you have to setup at least the following things depending on your system/network configuration:
- username and mail address
- ftp / http proxies ⇒ in networks needing proxy authentication, read the FAQ
- path for archive of downloaded source packages (aka local package pool)
Leave all other options at their initial value.
Toolchain installation
The toolchain must be installed only once before the Linux BSP can be compiled for the target.
In case of using a precompiled toolchain install it to /opt. Otherwise carefully follow the documentation for building toolchains found here or in the download section.
By default the toolchain will get installed to /opt/OSELAS.Toolchain-<version>.
To build the toolchain follow these commands:
After downloading OSELAS.Toolchain-2011.11.3.tar.bz2:
$ tar xzf OSELAS.Toolchain-2011.11.3.tar.bz2
$ cd OSELAS.Toolchain-2011.11.3/
$ ptxdist-2011.11.0 select/arm-v5te-linux-gnueabi_gcc-4.6.2_glibc-2.14.1_binutils-2.21.1a_kernel-2.6.39-sanitized.ptxconfig (for TQMa28)
$ ptxdist-2011.11.0 go
This process could take a few hours to complete. For any further information or in case you experience problems, refer to the official toolchain documentation. After compilation the Toolchain normally is already setup in the BSP project. So you can move on to the next step.
Installation of the BSP
Extract the package TQ-ARM-BSP-REV<version>.tgz to any directory (e.g. /opt or /home):
$ cd /opt/projekte
$ tar -xvf TQ-ARM-BSP-REV<version>.zip
$ cd TQ-ARM-BSP-REV<version>
This directory now is the build environment for your BSP.
Using PTXdist to create the BSP firmware
Getting help
The manual is your friend. See Downloads where to get it.
Configuration
To configure the system (e.g. add additional packages) you can start the PTXdist menu:
$ ptxdist menu
PTXdist menu
To add additional packages to your root filesystem simply use the ptxdist tool. The ncurses based UI is the same that is used by the linux kernel with “make menuconfig”. It can be used the following way:
- use the up / down arrow keys to navigate in the menu
- use the left / right arrow keys to navigate between buttons
- select / deselect packages and options using the SPACE key
- enter submenus or press buttons using the ENTER key
Dependencies between packages should be “automagically†resolved. Software is organized in sections.
Compilation
Select one of the supported hardware platforms, select a software configs and start building the image. On TQMa28 the hardware platform names are:
- configs/platforms/tqma28/tqma28-fsl/platformconfig (TQMa28 on MBa28 with u-boot 2009.08, kernel 2.6.35 and Freescale patches)
- configs/platforms/tqma28/tqma28/platformconfig (TQMa28 on MBa28 on a mainline u-boot 2013.04 and kernel 3.10)
Currently the following software configs are available:
- configs/systems/minimal/ptxconfig (minimal rootfs with busybox)
- configs/systems/qt/ptxconfig (rootfs with busybox and qt)
Selecting configs for tqma28-fsl:
$ ptxdist platform configs/platforms/tqma28/tqma28-fsl/platformconfig
$ ptxdist select configs/platforms/tqma28/tqma28-fsl/ptxconfig
$ ptxdist go
$ ptxdist images
Selecting configs for tqma28:
$ ptxdist platform configs/platforms/tqma28/tqma28/platformconfig
$ ptxdist select configs/systems/minimal/ptxconfig
$ ptxdist go
$ ptxdist images
PTXdist downloads some packages. If it reports some errors please
- verify your internet connection or proxy settings.
- make sure the package source is correct. Some package source pages will change from time to time.
(You can always try to download the source package manually and copy it to your package pool (by default: <BSP project>\src)) - some packages like bootloaders and kernels where you can select versions need to know about their hash sums. You have to calculate them using md5sum and enter the correct hash in the ptxdist configuration.
Adding own packages
PTXdist needs a package for every bit you need in your root FS. To add your software, files etc. you have to provide local packages. Follow the instructions of the developers section in the PTXdist manual. PTXdist provides templates as starting point for own packages. Type
$ ptxdist newpackage
to see what package templates exist.
Changing packages
PTXdist uses release tar balls for software it loads from the net. You have to work with patches, if you need to make changes of the source code. Follow the instructions of the developers section in the PTXdist manual (chapter 4 PTXdist Developer's Manual).
Changes that are made manually in the sources extracted to build directories will be deleted,
when PTXdist needs to redo a buildstep.
Adapting BSP for a custom product
-The BSP was developed for the Starterkit.-
To use it in a product with special requirements or a different basebord we suggest to define a custom platform (platformconfig).
It is also recommended to define a custom software config (ptxconfig) using one of the supplied configs as a starting point.
To start make a copy of the platform definition and select the new platform definition
$ cd <BSPROOT>
$ mkdir <BSPROOT>/configs/platforms/tqma28/<your-custom-platform>
$ cp -r <BSPROOT>/configs/platforms/tqma28/tqma28 <BSPROOT>/configs/platforms/tqma28/<your-custom-platform>
$ ptxdist platform <BSPROOT>/configs/platforms/tqma28/<your-custom-platform>/platformconfig
To start configuring your new platform type
$ ptxdist platformconfig
The first thing to change should be the platform name. Adapt things like kernel configuration, image creation etc. to your needs.
The new system will be built under <BSPROOT>/platform-<platformname_from_platformconfig>
To create a new software config based on an existing one, copy and select the new software config:
$ cd <BSPROOT>
$ mkdir <BSPROOT>/configs/systems/<your-custom-platform>
$ cp -r <BSPROOT>/configs/systems/minimal/ptxconfig <BSPROOT>/configs/<your-custom-platform>/ptxconfig
$ ptxdist select platform <BSPROOT>/configs<your-custom-platform>/ptxconfig
To start configuring your new software config
$ ptxdist menuconfig
Please refer to the build system documentation on how to go further.
Partition scheme
Changing the partition scheme may affect the boot loader update capability and / or the kernel command line parameters!
The following partition scheme is used for SD / eMMC images
- sector size = 512 Byte
| Sector | Size | Usage | in Partition table |
|---|---|---|---|
| 0x0000 … 0x0001 | 0x0002 sectors / 1kiB | MBR / Partition table | |
| 0x0002 … 0x0002 | 0x0001 sector / 512 B | U-Boot environment | |
| 0x3000 … 0x3FFF | 0x1000 sectors / 2MiB | device tree blob | |
| 0x4000 … 0x7FFF | 0x4000 sectors / 8MiB | U-Boot partition (!) | * |
| 0x8000 … 0xBFFF | 0x4000 sectors / 8MiB | Kernel partition | * |
| 0xC000 … 0x2BFFF | 0x20000 sectors / 64 MiB | RootFS partition | * |
| 0x2C000…0xABFFF | 0x80000 sectors / 256 MiB | free to use partition (!!) | * |
(!) The Freescale tool (sdimage) used to create the SD/eMMC image writes two copies of U-Boot to this partition. The secondary copy starts at the sector following the last sector of the primary copy. Therefore no absolute addresses can be given.
(!!) Currently only SD/eMMC images implement this partition. MfgTool profiles do not yet create this partition.
The partition scheme is defined for platforms TQMa28/TQMa28L/TQMa28-fsl using the config file
<BSPROOT>/configs/platforms/tqma28/tqma28/config/images/tqma28-hd.config
The creation of the image is controlled using the project local PTXdist package image-hd2. To create the image the genimage host tool is used. This tool is automatically selected and built. You can find the build directory under <BSPROOT>/platform-<tqma28-fsl | tqma28>/build-host/genimage. There is also a README file documenting how to use this tool and the config file.
Deployment
See MBa28 DIP switch settings for selecting the boot medium on the MBa28.
Finally, you will find the built images in platform-<platformname>/images.
To update bootloader / kernel in a running system you have to copy the images in your tftp directory and download them to the eMMC.
To install a new firmware use SD cards. To copy the built images on the host system to a connected card type:
$ cd <BSP project>/platform-<platform_name>/images
$ sudo dd if=tqma28_hd.img of=/dev/sdf bs=1M conv=fsync #Assuming the SD card is assigned to /dev/sdf
To find out what device file the SD card has, type “dmesg” after you connect the card to see the system messages. At the bottom you'll see some “Attached scsi …” messages along with something like:
[ 8197.588395] sdf: sdf1
Installation from bootable SD card
This procedure overwrites the MBR and all partitions
on the eMMC with images from the SD card.
The U-Boot environment is preserved.
See MBa28 DIP switch settings for selecting the boot medium on the MBa28.
Default boot mode of TQMa28 is eMMC boot:
LCD_DATA[4..0] = {0,1,0,0,1}
- When U-Boot on eMMC is not available: set boot mode to SD card: LCD_DATA[4..0] = {0,1,0,1,0}
(On MBa28, set DIP Switches S4.4 and S5.1 to ON, the others to OFF.) - Plug in card, power on device and stop autoboot
- Type command: run install_firmware
- Set boot mode back to eMMC
Install script usage
Current U-Boot versions provide a script that copies the MBR and partition contents from the SD card to the eMMC. This script is called via “run install_firmware” command at the U-Boot prompt. Due to memory limitations the root partition must be copied in a loop, each run copies the maximum memory amount available. To tell the script the size of your rootfs partition you have to use the rootblks16 variable.
This variable holds the hexadecimal number of 512-byte blocks your rootfs partition has in size.
setenv rootblks16 0x40000
This sets a 128MB partition.
Updating existing firmware from bootable SD card
Please note: At this state there is no way to extract the image sizes from the SD card.
Without them calculation of required sectors to store the images is not possible.
Therefore using this update method will grab and overwrite whole uboot/dtb/kernel partitions respectively.
- Boot from eMMC
- Plug in card, power on device and stop autoboot
- To update U-Boot type:
run upd_uboot_sd - To update device tree type:
run upd_fdt_sd - To update Kernel type:
run upd_kernel_sd
Updating existing firmware over ethernet
Updating U-Boot via ethernet does not create a secondary copy as expected by the MX28 as a fall-back level.
Make sure you read and setup your device according to this section:
Error: no PHY found or Segmentation fault when ifconfig up
- Boot from eMMC and stop autoboot
- Connect device via ethernet to a tftp server supplying the image
- Provide the correct network configuration:
setenv serverip 0.0.0.0
setenv netmask 255.255.255.0
setenv ipaddr 0.0.0.0 - Provide U-Boot the file name of the desired image on the server:
For U-Boot: setenv uboot filename
For device tree: setenv dtb filename
For Kernel: setenv kernel filename - Perform Update:
For U-Boot: run upd_uboot_net
For device tree: run upd_fdt_net
For Kernel: run upd_kernel_net
The u-boot update scripts automatically implement the selection of the primary copy to boot.
Using Freescale's MFG Tool
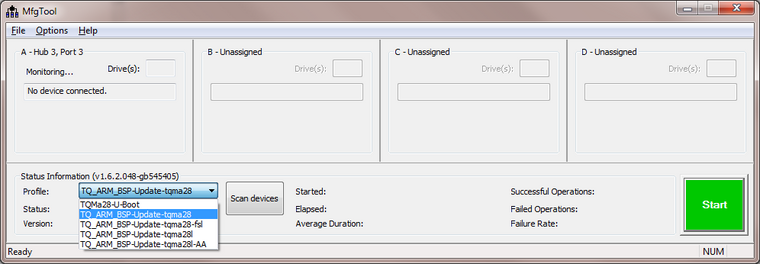
Starting with REV0106 the TQ-ARM-BSP offers the creation of profiles for Freescale Manufacturing Tool.
Currently these profiles can be created for platforms TQMa28, TQMa28-fsl, TQMa28L, TQMa28L-AA.
This is enabled by default but can be switched using
$ ptxdist platformconfig
in the menu new image creation options –> [ ] Create profile for Freescale MFGTool
The profile is built during images stage and named TQ_ARM_BSP-Update-<platform>.zip in the images/ directory.
To use it simply extract the zip into the Profiles/ subdirectory in the MfgTool folder.
When starting MfgTool you will see the profile appear in the selection box:
In the Options - Configuration menu each profile has the option to flash
- the Boot EEPROM and the complete e-MMC (eMMC+EEPROM) - only for TQMa28 modules REV0200
- the Boot EEPROM only (EEPROM only) - only for TQMa28 modules REV0200
- the complete firmware (eMMC only) (default)
- the device tree only (DTB only)
- the kernel only (Kernel only)
- and for debugging purposes load the U-Boot into RAM (U-Boot→RAM)
- To download you need the target hardware to be connected via USB0 to the PC running MfgTool.
- The boot mode must be set to USB recovery mode.
- Power up.
- The MfgTool should show a HID-compliant device.
Otherwise the target is either not connected or not in USB recovery mode. - Hit 'Start' and wait until Finished.
Using different boot media
NFS
To boot the TQMa28 from network you need a working bootloader in eMMC or SD-card which is able to get the kernel image over tftp and to provide the kernel with commandline settigns for NFS. You have to provide the images via tftp and nfs and to configure the bootloader (cf. U-Boot variables boot_nfs, addnfs, kernel, dtb, serverip, rootpath) to work with your tftp-server and your nfs-server.