TQMa64xxL - YOCTO Linux BSP documentation
Boot from eMMC Bootpartition
Boot from eMMC Bootpartition
On TQMa64xxL, it is possible to write the bootloader and the U-Boot image into the bootpartition of the eMMC and boot from it.
The setup requires the a bootloader (tiboot3.bin) and an U-Boot image (e.g. u-boot-tqma64xxl-mbax4xxl-2026.01+git-r0.img).
Please note that the first stage bootloader comes in three variants (GP, HSFS, HSSE) and the necessary bootloader binary needs to be renamed to tiboot3.bin. For more information see https://github.com/tq-systems/meta-tq/blob/wrynose/meta-tq/doc/README.TQMa64xxL.md#first-stage-bootloader-variants.
The following table provides an overview of the offsets in the eMMC bootpartition:
| Address | File | Size |
|---|---|---|
| 0x0000+ | tiboot3.bin | 768 KiB |
| 0x0600+ | uboot.img | 2 MiB |
| 0x1E00+ | environment | 128 KiB |
| 0x1F00+ | backup environment | 128 KiB |
Writing the U-Boot image to its location automatically includes the default environment.
Follow the below steps to boot from the eMMC bootpartition.
- Boot the TQMa64xxL from SD card and halt in U-Boot
- Activate the eMMC bootpartition using:
mmc partconf 0 1 1 1
- Enable the eMMC reset signal. This step is necessary for the board to work when booting from a bootpartition without a powercycle.Please note that this is a write-once operation that cannot be reversed.
mmc rst-function 0 1
- Boot into Linux and execute the following commands:
  echo 0 > /sys/block/mmcblk0boot0/force_ro
  dd if=/tmp/tiboot3.bin of=/dev/mmcblk0boot0 bs=512 seek=0 conv=fsync
  dd if=/tmp/u-boot.img of=/dev/mmcblk0boot0 bs=512 seek=1536 conv=fsync
  echo 1 > /sys/block/mmcblk0boot0/force_ro
This disables the write protection of mmcblk0boot0, writes the bootloader and the U-Boot into that partition and enables the eMMC write protection again.
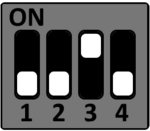
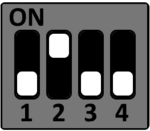
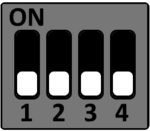
- Power off the board and set the DIP switches to boot from eMMC bootpartition:
S4

S5
S6
S7
STKa64xxL USB Boot
USB Boot
The TI Sitara AM64x CPU provides the option to boot from USB (host and device).
Prerequisites
- Build BSP following STKa64xxL Yocto BSP quickstart guide.
- Booting the STKa64xxL from USB device requires a Linux based host PC to run the dfu-util.
Boot from USB host (mass storage)
1. Format a USB flash drive with FAT32 filesystem.
2. Copy the files listed below from the Yocto buildspace deploy directory to the USB flash drive prepared with FAT32:
- u-boot.img
- boot.scr
- tiboot3.bin
3. Connect the USB flash drive with the USB 3.0 the USB-OTG interface.
4. Set the STKa64xxL DIP switches to boot from USB host (mass storage).
S4 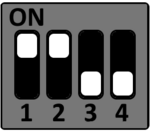
S5 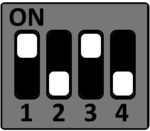
S6 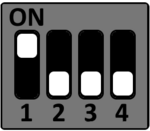
S7
5. Connect host PC with STKa64xxL connector X2 and setup the terminal program.
Please see the terminal_emulator section how to setup a serial debug connection.
6. Power on the STKa64xxL to boot from USB.
Boot from USB device (dfu-util)
Please check that dfu-util is installed the Linux host.
1. Copy the files below from the Yocto buildspace deploy directory deploy e.g. the home folder:
- u-boot.img
- tiboot3.bin
2. Connect STKa64xxL X1 and X2 with a micro USB cable to the Host PC.
- X1 is used to connect the STKa64xxL as USB device
- X2 is used as serial debug connection
3. Set the STKa64xxL DIP switches to boot from USB device (dfu-util).
S4
S5
S6
S7
4. Power up the STKa64xxL.
5. Open a second terminal for the serial debug connection with e.g. Minicom
Please see the terminal_emulator section how to setup a serial debug connection.
6. Open terminal (shell) on Linux host and execute the commands below to boot the STKa64xxL via USB device.
After a warm boot (reset from U-Boot or reboot from Linux), the initial load of tiboot3.bin must be skipped.
sudo dfu-util -a bootloader -D tiboot3.bin
If the STKa64xxL has been reset from U-Boot or Linux it is not required to load tiboot.bin3 twice, so only the two commands below have to be executed.
sudo dfu-util -R -a bootloader -D tiboot3.bin
sudo dfu-util -R -a u-boot.img -D u-boot.img
Yocto Images
Target Machine: tqma64xxL-mbax4xxl
System Images
| Boot Device | Symlink | File |
|---|---|---|
| SD Card/eMMC | tq-image-weston-debug-tqma64xxl-mbax4xxl.wic | tq-image-weston-debug-tqma64xxl-mbax4xxl-<build_timestamp>.rootfs.wic |
Bootloader Binaries
- tiboot3-am64x-gp-evm.bin (AM64x Silicon Revision 1.0 or 2.0, General Purpose variant)
- tiboot3-am64x_sr2-hs-fs-evm.bin (AM64x Silicon Revision 2.0, High Security variant, field-securable)
- tiboot3-am64x_sr2-hs-evm.bin (AM64x Silicon Revision 2.0, High Security variant, security enforced)
Please refer to the Secure Device Processor SDK documention for more information on the High Security CPU variants. This documentation must be obtained directly from TI. To select the variant to use, set the SYSFW_DEFAULT_VARIANT variable to “am64x-gp”, “am64x_sr2-hs-fs” or “am64x_sr2-hs” (in local.conf or a custom machine definition), to match the used AM64x CPU variant and security enforcement status. The default value is “am64x-gp”. The selected variant will be installed to the boot partition of the generated WIC images as tiboot3.bin. It is possible to change an existing image to boot on a different CPU variant by mounting the boot partition and renaming one of the bootloader binaries to tiboot3.bin.
| Boot Device | Symlink | File |
|---|---|---|
| SD/eMMC | u-boot.img | u-boot-tqma64xxl-mbax4xxl-2021.01+<git_commit_id>-r0.img |
| tispl.bin | tispl.bin-tqma64xxl-mbax4xxl-2021.01+<git_commit_id>-r0 | |
| tiboot3.bin | tiboot3-am64x-gp-evm.bin |
Linux Kernel Image
| Symlink | File |
|---|---|
| Image | Image–5.10.152+<git_commit_id-r0-tqma64xxl-mbax4xxl-<timestamp>.bin |
Devicetree Blobs
| Symlink | Description |
|---|---|
| k3-am642-tqma64xxl-mbax4xxl-tqma64xxl-mbax4xxl.dtb | Default |
| k3-am64-tqma64xxl-mbax4xxl-sdcard.dtbo | SD Card Devicetree overlay |
| k3-am64-tqma64xxl-mbax4xxl-wlan.dtbo | WLAN Devicetree overlay |
Rootfs images
| Symlink | File |
|---|---|
| tq-image-weston-debug-tqma64xxl-mbax4xxl.tar.gz | tq-image-weston-debug-tqma64xxl-mbax4xxl-<build_timestamp>.rootfs.tar.gz |