TQMa67xx - YOCTO Linux BSP documentation
Create SD-Card image
Create SD Card with BSP Image
The Image can be simply written to the SD Card by using the dd shell command in Linux:
$ cd <path to your image>
$ sudo dd if=tq-image-weston-debug-tqma67xx-mba67xx.rootfs.wic of=/dev/sdc bs=1M conv=fsync #Assuming the SD card is assigned to /dev/sdc
To identify the SD card in Linux the shell command dmesg can be used:
- Open a new terminal
- Execute the following command without plugged SD Card
$ dmesg | tail -n 15
- Insert SD Card and wait a few seconds
- Run the command from step two again
$ dmesg | tail -n 15
 #plug in SD Card into the reader
$ dmesg | tail -n 15
After creating the SD card image, insert the card into the kit and make sure that the boot switches are configured correctly.
Then after powering the kit, it should boot and start sending serial output. After booting, you can log in to the system with the user “root”.
DFU USB Boot (dfu-util)
DFU USB Boot for TQMa67xx(L)
dfu-util is an open source host tool to download (and upload) firmware to USB devices implementing the USB Device Firmware Upgrade (DFU) class. The boot ROM of the AM67 implements a USB DFU gadget, so the bootloader can be loaded and started directly over USB without writing anything to eMMC or SD card. This is useful for initial bring-up or for booting a board with empty/erased boot media.
Tool and source code are available at the dfu-util project page.
Prerequisites
- A working Linux host PC.
- dfu-util installed:
sudo apt install dfu-util
- The bootloader images for the module (located in the Yocto deploy directory):
- First stage:
tiboot3.bin - Second stage:
u-boot.img
Without it, dfu-util detects the device but fails with
dfu-util: Cannot open DFU device XXXX:XXXX.
Prepare Hardware (USB DFU Boot Mode)
To communicate with the module over USB DFU, set the boot mode to “USB device (dfu-util)”.
- Power off the module.
- Set the boot mode DIP switch as follows:
USB device (dfu-util)
S1
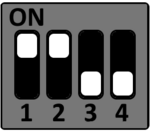
S2
S3
S4
- Connect the host PC via a suitable USB cable to the USB DFU port.
- Power on the board.
- Verify that the device is detected:
sudo dfu-util -l
The ROM bootloader exposes two alternate settings - bootloader (alt 0) and SocId (alt 1):
Found DFU: [0451:6165] ver=0200, devnum=50, cfg=1, intf=0, path="3-2", alt=1, name="SocId", serial="01.00.00.00"
Found DFU: [0451:6165] ver=0200, devnum=50, cfg=1, intf=0, path="3-2", alt=0, name="bootloader", serial="01.00.00.00"
Usage
Load the first stage (tiboot3.bin)
Load the R5 SPL into the ROM bootloader alternate setting. The -R option requests a USB reset after the download so the loaded stage can take over.
sudo dfu-util -R -a bootloader -D tiboot3.bin
After the download, the SPL starts and the device re-enumerates, exposing a new set of DFU alternate settings (e.g. u-boot.img, tispl.bin).
Invalid DFU suffix signature / unable to read DFU status after completion / can't detach
Load U-Boot (u-boot.img)
Once the first stage is running, the new alternate settings can be listed again if needed:
sudo dfu-util -l
Load the second stage into the u-boot.img alternate setting:
sudo dfu-util -R -a u-boot.img -D u-boot.img
A successful download ends with:
state(7) = dfuMANIFEST, status(0) = No error condition is present
state(2) = dfuIDLE, status(0) = No error condition is present
Done!
U-Boot now starts; the prompt is available on the serial console (X7 on the MBa67xx).