TQMa8XxS - YOCTO Linux BSP documentation
Deployment Yocto
BSP Binaries
- All binaries are intended for the usage on a STKa8Xx
- The symlinks point to the files of the last build
Target Machine: tqma8xdps-mb-smarc-2
System Images
| Boot Device | Symlink | File |
|---|---|---|
| SD Card/eMMC | tq-image-weston-tqma8xdps-mb-smarc-2.wic | tq-image-weston-tqma8xdps-mb-smarc-2-<build_timestamp>.rootfs.wic |
Bootloader Binaries
| Boot Device | Symlink | File |
|---|---|---|
| SD/eMMC | imx-boot | imx-boot-tqma8xdps-mb-smarc-2-sd.bin-flash_spl |
Linux Kernel Image
| Symlink | File |
|---|---|
| Image | Image–5.10.74+git0+a988e804a1-r0-tqma8xdps-mb-smarc-2-<build_timestamp>.bin |
Devicetree Blobs
| Symlink | Description |
|---|---|
| imx8dxp-tqma8xdps-mb-smarc-2.dtb | Default |
| imx8dxp-tqma8xdps-mb-smarc-2-lvds0-tm070jvhg33.dtb | Default with LVDS0 interface activated |
| imx8dxp-tqma8xdps-mb-smarc-2-lvds1-tm070jvhg33.dtb | Default with LVDS1 interface activated |
| imx8dxp-tqma8xdps-mb-smarc-2-rpmsg.dtb | Default with RPMSG support |
Rootfs images
| Symlink | File |
|---|---|
| tq-image-weston-tqma8xdps-mb-smarc-2.ext4 | tq-image-weston-tqma8xdps-mb-smarc-2-<build_timestamp>.rootfs.ext4 |
| tq-image-weston-tqma8xdps-mb-smarc-2.tar.gz | tq-image-weston-tqma8xdps-mb-smarc-2-<build_timestamp>.rootfs.tar.gz |
Target Machine: tqma8xqps-mb-smarc-2
System Images
| Boot Device | Symlink | File |
|---|---|---|
| SD Card/eMMC | tq-image-weston-tqma8xqps-mb-smarc-2.wic | tq-image-weston-tqma8xqps-mb-smarc-2-<build_timestamp>.rootfs.wic |
Bootloader Binaries
| Boot Device | Symlink | File |
|---|---|---|
| SD/eMMC | imx-boot | imx-boot-tqma8xqps-mb-smarc-2-sd.bin-flash_spl |
Linux Kernel Image
| Symlink | File |
|---|---|
| Image | Image–5.10.74+git0+a988e804a1-r0-tqma8xqps-mb-smarc-2-<build_timestamp>.bin |
Devicetree Blobs
| Symlink | Description |
|---|---|
| imx8qxp-tqma8xqps-mb-smarc-2.dtb | Default |
| imx8qxp-tqma8xqps-mb-smarc-2-lvds0-tm070jvhg33.dtb | Default with LVDS0 interface activated |
| imx8qxp-tqma8xqps-mb-smarc-2-lvds1-tm070jvhg33.dtb | Default with LVDS1 interface activated |
| imx8qxp-tqma8xqps-mb-smarc-2-rpmsg.dtb | Default with RPMSG support |
Rootfs images
| Symlink | File |
|---|---|
| tq-image-weston-tqma8xqps-mb-smarc-2.ext4 | tq-image-weston-tqma8xqps-mb-smarc-2-<build_timestamp>.rootfs.ext4 |
| tq-image-weston-tqma8xqps-mb-smarc-2.tar.gz | tq-image-weston-tqma8xqps-mb-smarc-2-<build_timestamp>.rootfs.tar.gz |
Yocto Partitions
SD / eMMC image
| Sector 1) | Size 2) | Contents | Linux (SD-Card) | Linux (eMMC) | Mountpoint |
|---|---|---|---|---|---|
0x000000 … 0x000000 | 0x0001 sector / 512 B | MBR / Partition Table | unpartitioned area | n/a | |
0x000001 … 0x00003F | 0x003F sectors / 32256 B | none | |||
0x000040 … 0x001FFF | 0x1FC0 sectors / 4064 kiB | bootstream (U-Boot) | |||
0x002000 … 0x003FFF | 0x2000 sectors / 4 MiB | U-Boot environment | |||
0x004000 … 0x023FFF | 0x20000 sectors / 64 MiB | firmware (Kernel, devicetrees) | mmcblk1p1 | mmcblk0p1 | /boot |
0x024000 … | actual size depends on contents of RootFS | RootFS | mmcblk1p2 | mmcblk0p2 | / |
Create SD Card with BSP Image
The Image can be simply written to the SD Card by using the dd shell command in Linux:
$ cd <path to your image>
$ sudo dd if=tq-image-qt5-tqma8xd-mba8xx-<build Timestamp>.rootfs.wic of=/dev/sdc bs=1M conv=fsync #Assuming the SD card is assigned to /dev/sdc
To identify the SD card in Linux the shell command dmesg can be used:
- Open a new terminal
- Execute the following command without plugged SD Card
$ dmesg | tail -n 15
- Insert SD Card and wait a few seconds
- Run the command from step two again
$ dmesg | tail -n 15
 #plug in SD Card into the reader
$ dmesg | tail -n 15
Updating existing firmware over ethernet
A good approach to update the firmare components U-Boot,Linux kernel and devicetree in a running system it to load them from a tftp server.
This process requires a running TFTP server, please see the following page how to setup TFTP Server.
After setting up the TFTP server, the binaries to be updated must be copied into the TFTP directory.
Update Process
1. Setup the Starterkit to boot from eMMC or SD
2. Connect the kit to the network with TFTP server supplying the binaries via ethernet on connector ETH1 (X18)
3. Power up the system and interrupt the boot process in U-Boot
Hit any key to stop autoboot:  0
=>
3. Setup the ethernet interface:
Set network settings using DHCP
4. Set U-Boot variable mmcdev according to the drive you want to write to.
=> setenv mmcdev <device_number>
Device assignment:
mmcdev 0 = eMMC
mmcdev 1 = SD Card
5. Set the file name of the binary to update in U-Boot :
- For U-Boot update: ⇒ setenv uboot <filename>
e.g. bootstream.bin - For devicetree update: ⇒ setenv fdt_file <filename>
e.g. fsl-imx8qxp-tqma8xqp-mba8xx.dtb - For Linux kernel update: ⇒ setenv image <filename>
e.g. Image
6. Perform Update by running the update command:
- U-Boot update:
=> run update_uboot_mmc
- Device Tree update:
=> run update_fdt_mmc
- Kernel update:
=> run update_kernel_mmc
Copy Firmware from SD card to eMMC using U-Boot
- Write Image to SD card (use dd command under Linux or Win32diskImager under Windows)
- Set Starterkit to boot from SD, please see DIP Switch Settings
- Interrupt the boot process to get to the U-Boot prompt
- Use the following commands to copy the SD card to eMMMC
1. Run the following commands in the Uboot shell to create update script:
setenv root_loop 'setenv start 24000 && setenv r1 $rootblks16 && while itest $r1 -gt 0; do if itest $r1 -gt 0x100000; then setenv count 0x100000; else setenv count $r1; fi && mmc dev 1 && mmc read $loadaddr $start $count && mmc dev 0 && mmc write $loadaddr $start $count && setexpr start $start + $count && setexpr r1 $r1 - $count; done; setenv r1; setenv start; setenv count'
setenv install_firmware 'echo MBR... && mmc dev 1 && mmc read $loadaddr 0 1 && mmc dev 0 && mmc write $loadaddr 0 1 && echo U-Boot... && mmc dev 1 && mmc read $loadaddr 3F 1FC0 && mmc dev 0 && mmc write $loadaddr 3F 1FC0 && echo U-Boot environment... && mmc dev 1 && mmc read $loadaddr 2000 2000 && mmc dev 0 && mmc write $loadaddr 2000 2000 && echo Firmware Partition... && mmc dev 1 && mmc read $loadaddr 4000 20000 && mmc dev 0 && mmc write $loadaddr 4000 20000 && echo Root FS... && run root_loop'
- create the environment variable rootblks16 and set the value accordingly to the size of the RootFS in this case 2070MB.
To calculate the value of rootblks16 devide the size of the image in byte by 512 and convert the result into a hex value.
2070 * 1024 * 1024 = 2170552320
2170552320 / 512 = 4239360
4239360 = 40B000HEX
setenv rootblks16 0x205800
2. Save environment U-boot environment (optional):
=> saveenv
3. run the following command to start the update procedure:
=> run install_firmware
Using NFS boot
Prerequisites
To boot the TQMa8Xx from network you need a working bootloader in eMMC/SD-card or SPI-NOR (placement option on TQMa8Xx ) which is able to get the kernel image over tftp and to provide the kernel with commandline settings for NFS. The dtb-file and kernel image have to be provided via tftp and the rootfs via nfs.
Configuration of U-Boot Environment
The bootloader environment needs to be modified to work with your tftp-server and your nfs-server.
1. Prepare network interface:
Set network settings using DHCP
2. set the Uboot variables for TFTP and NFS:
- setenv rootpath <rootpath> (NFS directory has to set in /etc/exports on the Computer that runs the NFS server first)
- setenv fdt_file <fdt_file> (name of devicetree file to be downloaded from the tftp server)
- setenv image <image> (name of the Linux kernel image to be downloaded from the tftp server)
3. Run the uboot script to boot from nfs:
uboot command to start netboot
=> run netboot
Create SD-Card image
Create SD Card with BSP Image
There are two common ways to write the image to an SD card: using the highly recommended bmaptool (which is significantly faster) or the standard dd command.
Method 1: Using bmaptool (Recommended)
The bmaptool provides a faster and safer way to flash images. It automatically utilizes the .bmap file to skip empty blocks, verifies the integrity during flashing, and can flash compressed images (like .wic.zst) on the fly without manual extraction.
$ cd <path to your image>
$ sudo bmaptool copy tq-image-weston-debug-tqma8xqps-mb-smarc-2.rootfs.wic.zst /dev/sdc #Assuming the SD card is assigned to /dev/sdc
Method 2: Using the dd command
Alternatively, the uncompressed image can be simply written to the SD Card by using the dd shell command in Linux:
$ cd <path to your image>
$ sudo dd if=tq-image-weston-debug-tqma8xqps-mb-smarc-2.rootfs.wic of=/dev/sdc bs=1M conv=fsync #Assuming the SD card is assigned to /dev/sdc
Identify the SD Card
To identify the SD card in Linux, the shell command dmesg can be used:
- Open a new terminal
- Execute the following command without plugged SD Card:
$ dmesg | tail -n 15
- Insert SD Card and wait a few seconds
- Run the command from step two again:
$ dmesg | tail -n 15
#plug in SD Card into the reader
$ dmesg | tail -n 15
NXP UUU (Universal Update Utility)
NXP UUU Tool for TQMa8XxS
The UUU (Universal Update Utility) is an open source program provided by NXP, which is the successor of NXP's MFG Tools, intended to download and execute code on the i.MX SoC family via the Serial Download Protocol (SDP). Documentation, source code, and prebuilt tool releases are available via the NXP mfgtools github repository.
- A working Host PC (Linux or Windows).
- The latest UUU release (downloadable from the NXP GitHub releases page).
- The corresponding image files for the TQMa8XxS (located in the Yocto deploy directory):
- Bootstream:
imx-boot-tqma8xqps-mb-smarc-2-mfgtool.bin-flash_spl - WIC-Image:
*.wicor*.wic.zst(e.g.,tq-image-weston-debug-tqma8xqps-mb-smarc-2.rootfs.wic.zst)
Prepare Hardware (Serial Downloader Mode)
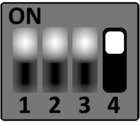
To communicate with the module via USB, it must be set to “Serial Download” mode.
- Power off the module.
- Set the DIP switch S3 on the mainboard (MB-SMARC-2) as follows:
Serial Downloader
S1
- Connect the Host PC via a suitable USB cable to the X4 connector (USB0).
- Power on the board.
- Verify that the device is detected by running the following command in the Host PC terminal:
uuu -lsusb.
UUU Usage
Load and start U-Boot in RAM
To initially boot the board (e.g., with an empty flash memory), U-Boot can be loaded directly into RAM without writing to the eMMC.
Execute the following command in the folder containing the UUU binary and the bootstream:
sudo uuu <bootstream>
Example for the TQMa8XxS:
sudo uuu imx-boot-tqma8xqps-mb-smarc-2-mfgtool.bin-flash_spl_uboot
Program complete image to eMMC
This command boots the board and uses the booted system to flash the bootstream and the WIC image to the eMMC.
sudo uuu -bmap -b emmc_all <bootstream> <wic-image>
Example for the TQMa8XxS:
sudo uuu -bmap -b emmc_all imx-boot-tqma8xqps-mb-smarc-2.bin-flash_spl tq-image-weston-debug-tqma8xqps-mb-smarc-2.rootfs.wic.zst
Use a custom workflow (Custom Cmdlist)
For custom flashing procedures (e.g., if you want to program a WIC image to eMMC without writing the boot stream to the eMMC boot partition), UUU commands can be collected in a cmdlist file.
- Create a text file (e.g.,
uuu.tqma8xxs) in the same directory as the UUU tool. - Insert your desired UUU commands (you can find examples in the UUU documentation).
- Execute the script by passing the
BOOTSTREAMandWICIMAGEvariables:
uuu -e BOOTSTREAM=<bootstream> -e WICIMAGE=<wic image> uuu.tqma8xxs
An example of a custom script can be found here:
uuu_version 1.5.4

SDPS: delay 500
SDPS: @ boot -f @BOOTSTREAM@

SDPV: delay 1000
SDPV: @ write -f @BOOTSTREAM@ -skipspl -scanterm -scanlimited 0x800000
SDPV: jump -scanlimited 0x800000

FB: ucmd setenv fastboot_dev mmc
FB: ucmd setenv mmcdev ${emmc_dev}
FB: ucmd mmc dev ${emmc_dev}
FB: @ flash -raw2sparse all @WICIMAGE@
FB: done
If the wrong protocol is used in the UUU script (e.g., using SDP instead of SDPS on the i.MX8QXP), the UUU tool will detect the USB device, but the transfer will permanently freeze at the first command (e.g., visible as a hang at 1/ 0 [).
Tip: Determining the correct protocol for your SoC
By running the command
uuu.exe -v
(without any further arguments), the UUU tool lists its internal configuration. In the Pctl (Protocol) column, you can look up the correct protocol prefix assignment for the respective chip (in the Chip column).
Example excerpt:
        Pctl     Chip            Vid     Pid     BcdVersion      Serial_No
        ==================================================
        SDPS:    MX8QXP           0x1fc9  0x0129
        SDPS:    MX93            0x1fc9  0x014e
        SDPS:    MX95            0x1fc9  0x015d
        SDP:     MX6Q            0x15a2  0x0054
        SDP:     MX8MM           0x1fc9  0x0134
Here you can see that an i.MX8MM script must begin with SDP:, while an i.MX8QXP script strictly requires SDPS:.