This is an old revision of the document!
Eclipse IDE
The installation of the Eclipse IDE and its configuration for software development on the TQ-modules is described on this page.
Used versions:
- Ubuntu 10.04
- Ubuntu 11.04
- Eclipse Indigo
- CDT 8.0
- TQMa28 with i.MX28 (ARM9)
- TQMa35 with i.MX35 (ARM11)
- LTIB 9.1.1
- ELDK 4.2
Installation
Download complete package
In the repositories Ubuntu 10.04 provides the Eclipse Galileo. The version of CDT for Eclipse Galileo is 6.0.2, this does not yet support features for cross-compiling. For Ubuntu 10.04 we get the packed version of Eclipse Indigo with CDT 8.0. These and possibly newer ones are available at the following download page:
http://www.Eclipse.org/cdt/downloads.php
If you follow on this page the link to the desired Eclipse package (Eclipse CDT 8.0 for Indigo), there is a download link for the different architectures in the right column.
Alternatively, you can directly go to http://www.Eclipse.org/downloads/. There you will find the same overview of available packages. After selecting “Linux” on top right, you can download the package
(e.g.:
Prefix: arm-none-linux-gnueabi-
Path: /opt/freescale/usr/local/gcc-4.3.3-glibc-2.8-cs2009q1-203/arm-none-linux-gnueabi/bin
* Press Finish in the next window.
===== Creating a project from existing sources =====
Requirements:
* Source code exists
* Makefile exists
* Project can be built manually at the console
.
- Start Eclipse: user@ubuntu:~/Downloads/Eclipse$ ./Eclipse&
- Create a new project: in menu with File > New > C Project
- Assign a project name in the wizard (e.g. Hello World) and remove the checkmark at use default location. Then specify the location of the existing project e.g. /home/user/src/hello_world/.
- Select Cross-Compile Project as project type and Cross GCC as toolchain.
- Close the wizard with Finish.
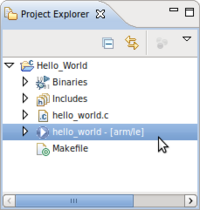
- The project with existing source files should now show up on the left of the Project Explorer. Now the automatic makefile has to be disabled in the project properties.
- Right click on the project name and select Properties in the context menu. Select menu item C/CBuild'' in the setting dialog. Turn off the option ''Generate Makefiles automatically'' there. {{ :Eclipse:screenshot-properties_for_hello_world.png?200
/opt/freescale/usr/local/gcc-4.3.3-glibc-2.8-cs2009q1-203/arm-none-linux-gnueabi/bin/arm-none-linux-gnueabi-gcc
2. Open properties of an Eclipse project (right click on the project in Project Explorer → Properties) and note the configuration shown above.
3. Click on Settings under C/C++ Build and mark GCC C Ccompiler at Tool Settings.
4. Change the command gcc to
/opt/freescale/usr/local/gcc-4.3.3-glibc-2.8-cs2009q1-203/arm-none-linux-gnueabi/bin/arm-none-linux-gnueabi-gcc
5. Now the include directory of the target Linux has to be given to Eclipse to compile. For this purpose expand GCC C Compiler and select the entry includes.
6. Add /opt/ltib/src/kernel/linux-2.6-denx/include.
7. Repeat step 4 for the GCC Linker.
8. Click on Libraries under the GCC Linker.
9. Add the directories /opt/ltib/rootfs/lib and /opt/ltib/rootfs/usr/lib to the Library search path(-L).
10. Repeat step 4 for the GCC Assembler, but with the command
/opt/freescale/usr/local/gcc-4.3.3-glibc-2.8-cs2009q1-203/arm-none-linux-gnueabi/bin/arm-none-linux-gnueabi-as
11. Open the tab Binary Parsers, deselect the Elf Parser and select the GNU Elf Parser.
12. Change its addr2line Command to
/opt/freescale/usr/local/gcc-4.3.3-glibc-2.8-cs2009q1-203/arm-none-linux-gnueabi/bin/arm-none-linux-gnueabi-addr2line
13. Change its c++filt Command to
/opt/freescale/usr/local/gcc-4.3.3-glibc-2.8-cs2009q1-203/arm-none-linux-gnueabi/bin/arm-none-linux-gnueabi-c++filt
14. Apply changes with Apply and OK.
Now the project for the target hardware is built in the chosen configuration. To copy the created binary to the RootFS the following has to be done:
In the project properties click on Build Steps under C/C++ Build → Settings and enter the following command at the Post-build steps:
cp /<workspace>/<project>/<Configuration>/<output binary> /opt/ltib/rootfs/home/<user>/
<note>
Copying directly into LTIB RootFS only works if the user rights of Eclipse permit to write to that location. The rights of the target directory must be set accordingly before, if necessary.
</note>
===== Demo project =====
hello_world.zip
A “Hello World” demo project was created. With a correctly installed and configured ELDK this project should compile with Eclipse and CDT.
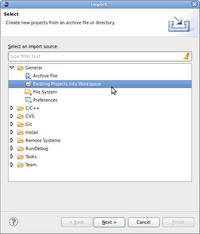
To import the project simply select File > Import… in the menu. Select Existing Projects into Workspace in the wizard.
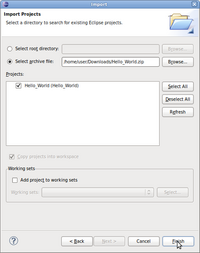
 In the next form select the downloaded ZIP archive and complete the import with “Finish”.
 <note tip>
Should there be problems when compiling, you can first run the build process on the console with a direct call of
 make. It will then create an executable program.
</note>
===== Debugging =====
* Debugging with Eclipse, RSE and gdb
* Debugging with Eclipse without RSE, but with gdb
===== Sources =====
* http://lists.denx.de/pipermail/eldk/2008-February/000079.html
* http://cache.freescale.com/files/dsp/doc/app_note/AN3870.pdf
* http://lwn.net/images/conf/rtlws11/papers/proc/p09.pdf
* http://comments.gmane.org/gmane.comp.embedded.eldk/1
* http://wiki.Eclipse.org/CDT/User/FAQ
