This is an old revision of the document!
Eclipse IDE
The installation of the Eclipse IDE and its configuration for software development on the TQ-modules is described on this page.
Used versions:
- Ubuntu 10.04
- Ubuntu 11.04
- Eclipse Indigo
- CDT 8.0
- TQMa28 with i.MX28 (ARM9)
- TQMa35 with i.MX35 (ARM11)
- LTIB 9.1.1
- ELDK 4.2
Installation
Download complete package
In the repositories Ubuntu 10.04 provides the Eclipse Galileo. The version of CDT for Eclipse Galileo is 6.0.2, this does not yet support features for cross-compiling. For Ubuntu 10.04 we get the packed version of Eclipse Indigo with CDT 8.0. These and possibly newer ones are available at the following download page:
http://www.Eclipse.org/cdt/downloads.php
If you follow on this page the link to the desired Eclipse package (Eclipse CDT 8.0 for Indigo), there is a download link for the different architectures in the right column.
Alternatively, you can directly go to http://www.Eclipse.org/downloads/. There you will find the same overview of available packages. After selecting “Linux” on top right, you can download the package
Eclipse IDE for C/C++ Linux Developers (includes Incubating components)
The executable Eclipse is in the extracted folder. No plugins have to be installed. Sometimes it may happen, however, that a Java runtime environment is required to execute Eclipse. This is installed with the following command:
user@ubuntu:~$ sudo apt-get install default-jre
Installation using apt-get
The Eclipse platform is installed with apt-get:
user@ubuntu:~$ sudo apt-get install Eclipse-platform
Ubuntu 10.04 supplies the very old Eclipse Galileo. It is recommended to dirctly download a newer packet. See download_complete_package
The package Eclipse-platform only contains the platform and no language-specific plugins. These must be installed separately using the plugin manager. An existing installation of Eclipse can be used as well.
Configuration
Workspace: A workspace has to be created after Eclipse is launched. The workspace is in a folder in the file system. Projects can easily be referenced within the workspace. Different workspaces are primarily useful for different programs or for different purposes (e.g., a workspace for embedded projects, a workspace for web development, a workspace for Java projects).
Environment:
Starting Eclipse by double clicking in the file explorer does not take on the environment variables of the shell.
The first way to use Eclipse with the environment variables is to start Eclipse from the console.
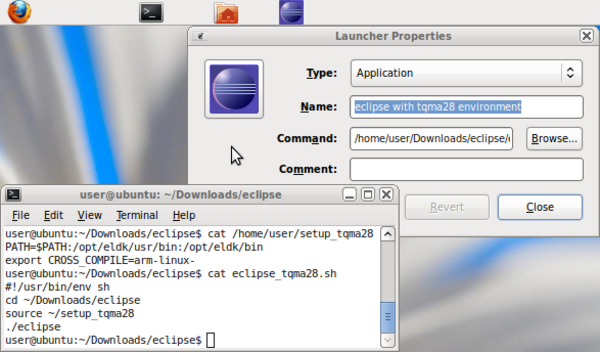
Another option is to write the relevant environment variables to a file, e.g.,
user@ubuntu:~$ echo 'PATH=$PATH:/opt/eldk/usr/bin:/opt/eldk/bin
export CROSS_COMPILE=arm-linux-' > setup_tqma28
and then to write a shell script that first sets the environment variables and then starts Eclipse:
echo '#!/usr/bin/env sh
source ~/setup_tqma28
cd ~/Eclipse
./Eclipse&' > eclipse_tqma28.sh && chmod u+x eclipse_tqma28.sh
By right click and Add to panel…, and there in the selection window Custom Application Launcher a “launcher” can be added to a window bar:
Creating a new cross compiler project
- Menu
File–>New–>C Project - Type in the name of the project and select with the
Cross GCCtheCross-Compile ProjectasProject type - Select the path to the Cross Compiler via
Browseand type in the prefix of the toolchain in the next window
(e.g.:
Prefix: arm-none-linux-gnueabi-
Path: /opt/freescale/usr/local/gcc-4.3.3-glibc-2.8-cs2009q1-203/arm-none-linux-gnueabi/bin
- Press
Finishin the next window.
Creating a project from existing sources
Requirements:
- Source code exists
- Makefile exists
- Project can be built manually at the console
- Start Eclipse:
user@ubuntu:~/Downloads/Eclipse$ ./Eclipse& - Create a new project: in menu with
File > New > C Project - Assign a project name in the wizard (e.g. Hello World) and remove the checkmark at
use default location. Then specify the location of the existing project e.g./home/user/src/hello_world/. - Select
Cross-Compile Projectas project type andCross GCCas toolchain. - Close the wizard with
Finish.
- The project with existing source files should now show up on the left of the Project Explorer. Now the automatic makefile has to be disabled in the project properties.
- Right click on the project name and select
Propertiesin the context menu. Select menu itemC/C++ Buildin the setting dialog. Turn off the optionGenerate Makefiles automaticallythere.
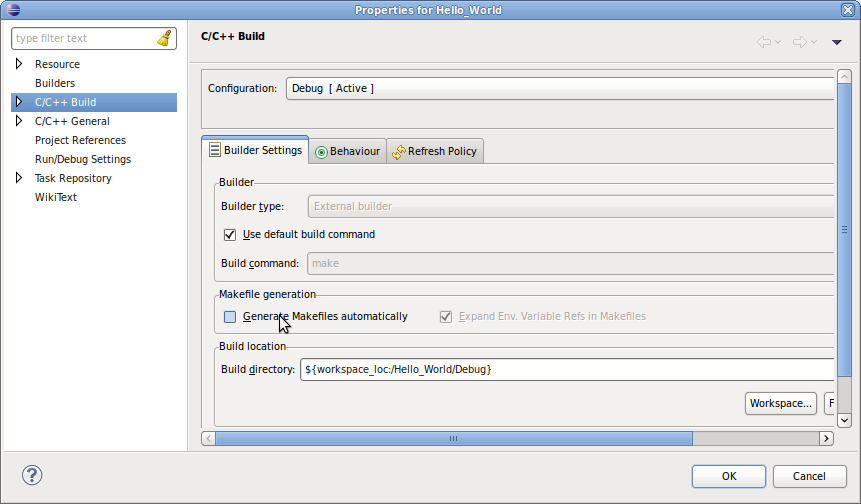
Build the project with a click on the hammer.
- The binary with the additional information about the architecture, in our case “arm”, is in the Project Explorer after a successful build.
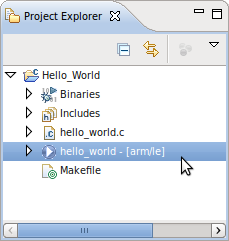
The wrong compiler was chosen if the host architecture (e.g. x86) is stated instead of “arm”. See also
Cross compiling with Eclipse
In Eclipse a project can be compiled for a different platform. Therefore a call of the target-specific compiler is required. Using the C compiler that comes with the package LTIB, the necessary settings in Eclipse are illustrated here. For this example, this is GCC 4.3.3.
1. Note the path to the compiler:
/opt/freescale/usr/local/gcc-4.3.3-glibc-2.8-cs2009q1-203/arm-none-linux-gnueabi/bin/arm-none-linux-gnueabi-gcc
2. Open properties of an Eclipse project (right click on the project in Project Explorer → Properties) and note the configuration shown above.
3. Click on Settings under C/C++ Build and mark GCC C Ccompiler at Tool Settings.
4. Change the command gcc to
/opt/freescale/usr/local/gcc-4.3.3-glibc-2.8-cs2009q1-203/arm-none-linux-gnueabi/bin/arm-none-linux-gnueabi-gcc
5. Now the include directory of the target Linux has to be given to Eclipse to compile. For this purpose expand GCC C Compiler and select the entry includes.
6. Add /opt/ltib/src/kernel/linux-2.6-denx/include.
7. Repeat step 4 for the GCC Linker.
8. Click on Libraries under the GCC Linker.
9. Add the directories /opt/ltib/rootfs/lib and /opt/ltib/rootfs/usr/lib to the Library search path(-L).
10. Repeat step 4 for the GCC Assembler, but with the command
/opt/freescale/usr/local/gcc-4.3.3-glibc-2.8-cs2009q1-203/arm-none-linux-gnueabi/bin/arm-none-linux-gnueabi-as
11. Open the tab Binary Parsers, deselect the Elf Parser and select the GNU Elf Parser.
12. Change its addr2line Command to
/opt/freescale/usr/local/gcc-4.3.3-glibc-2.8-cs2009q1-203/arm-none-linux-gnueabi/bin/arm-none-linux-gnueabi-addr2line
13. Change its c++filt Command to
/opt/freescale/usr/local/gcc-4.3.3-glibc-2.8-cs2009q1-203/arm-none-linux-gnueabi/bin/arm-none-linux-gnueabi-c++filt
14. Apply changes with Apply and OK.
Now the project for the target hardware is built in the chosen configuration. To copy the created binary to the RootFS the following has to be done:
In the project properties click on Build Steps under C/C++ Build → Settings and enter the following command at the Post-build steps:
cp /<workspace>/<project>/<Configuration>/<output binary> /opt/ltib/rootfs/home/<user>/
Copying directly into LTIB RootFS only works if the user rights of Eclipse permit to write to that location. The rights of the target directory must be set accordingly before, if necessary.
Demo project
A “Hello World” demo project was created. With a correctly installed and configured ELDK this project should compile with Eclipse and CDT.
To import the project simply select File > Import… in the menu. Select Existing Projects into Workspace in the wizard.
 In the next form select the downloaded ZIP archive and complete the import with “Finish”.

Should there be problems when compiling, you can first run the build process on the console with a direct call of make. It will then create an executable program.